IPVanish is a great choice for BitTorrent privacy, and is ranked among our top 5 Best VPNs for Torrenting.
This guide will show you exactly how to configure IPVanish (and your favorite torrent client) for maximum privacy while downloading torrents.
But First: Make sure you have an active IPVanish subscription! If you don’t have one yet, you can save 60% off 1-year IPVanish plans.
What you’ll learn in this guide:
- Why IPVanish is a great choice for private torrents
- The optimal IPVanish VPN settings for torrents
- How to activate and use the kill switch
- How to use IPVanish’s (included) SOCKS5 Proxy while torrenting
IPVanish is great for torrents — Here’s why:
To ever achieve cult status as a top-ranked torrent VPN (like PIA has), a VPN service needs to provide the following things:
- A True Zero-Log policy (no activity or connection logs. Period.)
- Torrents specifically allowed (and no record of banning frequent torrent downloaders)
- Fast speeds
- Apps for all platforms that users frequently use p2p (Mac, Windows, Android)
- Socks5 Proxy (Included free with all VPN plans)
- A built-in Kill Switch to prevent IP leaks
Many VPNs can claim 3-5 of these features, but few have all 6. IPVanish delivers on all counts, and at a more affordable price than competitors like ExpressVPN.
Logging Policy:
IPVanish does not monitor or log any online activity while connected to their VPN. They don’t even keep a record of your IP address after the session is over, or what server you connected to. This is because U.S. law doesn’t require user data retention for VPNs (only ISPs).
Your Public Torrent IP address is how almost all torrent activity is tracked worldwide. If you use a Zero-log provider like IPVanish, there is essentially no link between your true identity and the public IP (IPVanish’s) that appears in torrent swarms.
Torrent Policy:
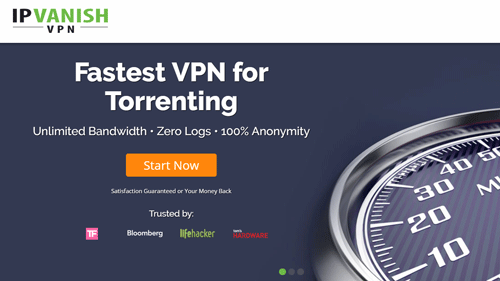
IPVanish specifically allows p2p activity on their network. In fact, the advertise themselves as the world’s fastest VPN for torrenting on one of their most popular landing pages (shown below).
Many other VPN services aren’t nearly this explicit in their torrent policy. Many hint that it isn’t allowed or leave it in a gray area. IPvanish specifically allows it and is a pro-p2p provider.
Speed
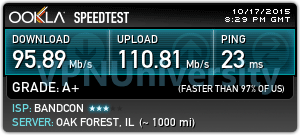
Fast downloads sourced from multiple peers is what makes bittorrent so amazing. So a VPN shouldn’t slow you down one bit. With IPVanish, we were able to get over 90 Mbps when testing on nearby servers (under 1000 miles). This makes them one of the fastest and most reliable VPNs in the world.
SOCKS Proxy
A SOCKS proxy is like a VPN for one app (minus the encryption). It is perfect for bittorrent and allows you to make a two-hop connection (vpn + proxy) for extra privacy (if you want it). IPVanish is one of the few providers that includes a SOCKS proxy for free instead of charging extra. PIA and NordVPN are two others who also include this feature.
We’ll show you how to use IPVanish’s proxy for torrenting later in this guide.
Kill Switch
A Kill Switch is an essential security feature that all VPNs should include in their software. When you turn it on, the app will kill all internet access whenever the VPN disconnects. This prevents your real IP address from accidentally becoming visible to torrent peers.
IPVanish’s software for Mac, Windows, and Android all include this feature, and it can be turned on with a single click.
How to use IPVanish VPN while torrenting
This is the most popular and easiest method to anonymize your torrents. It’s hassle-free (no torrent client setup required) and is highly secure.
Your public IP address will be replaced by one owned by IPVanish, and your torrent downloads will be encrypted with 256-bit encryption so that even your Internet Provider will have no idea WTF you’re doing online.
If you’re a bit more cautious, you can add the SOCKS proxy as shown later in this guide.
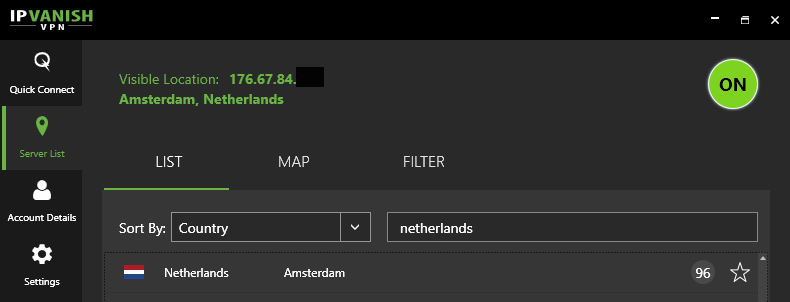
Step #1: Open the IPVanish App and choose (safe) server location
Before you open your torrent client (this method works with any of them), you need to connect to a VPN server. Open the IPVanish app on your device, and choose a server to connect to.
We recommend choosing one from a torrent-friendly country like:
- Netherlands
- Switzerland
- Mexico
- Spain
Personally we like the Netherlands location, and it’s a tried and true favorite of other top p2p VPN companies like Private Internet Access. Because of the sheer volume of Bittorrent activity on this location, however, you may find speeds a bit slower. If so, simply choose one of the 3 other options.
Step #2: Engage the Kill Switch
99+ percent of all tracked torrent activity is down through your public IP address. So… it’s essential that your real IP never leaks to your torrent peers if you want to keep your identity private while downloading. That’s why you definitely want to use the Kill-Switch feature.
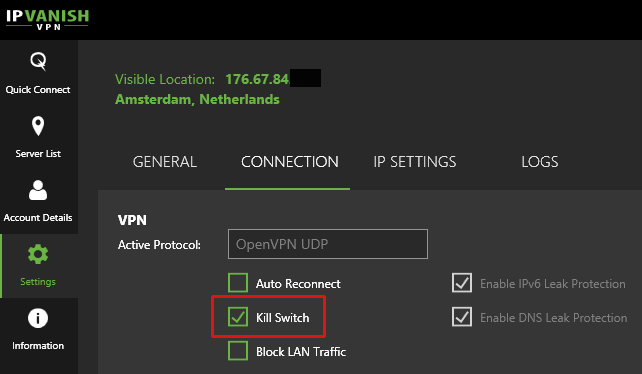
To Turn on the Kill Switch:
Go to: Settings > Connection
then simply check the box labeled ‘Kill Switch’ (shown below).
Important Note: If you disconnect the VPN, your internet access will shut down and won’t work again until you either:
- Reconnect to the VPN (or)
- Reset your network adapter through the troubleshooting menu
People often forget about this the first time (or two) it happens. Don’t forget, and it’ll save you major frustration while you try to figure out what’s happened to your internet.
Step #3: Check your Torrent IP address
Just to be safe, you’ll check what IP address your torrent peers see when connecting with your device (whether seeding or leaching). To do this, we’ll use a special tracking torrent and our tutorial on how to check your IP while torrenting.
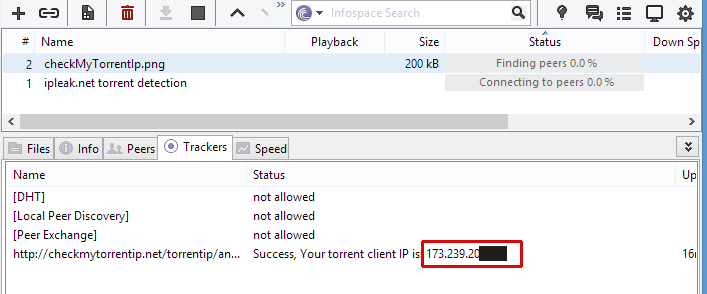
Simply follow this guide, and make sure that the IP that appears in the swarm belongs to IPVanish and isn’t your real IP address.
Option 2: Use IPVanish’s SOCKS5 Proxy for torrents
About 2 years ago (at our suggestion) IPVanish decided to include a Netherlands-based SOCKS5 proxy server with all VPN subscriptions. This feature is most commonly used by hardcore torrent users to add a second IP-hop (and second layer of anonymity) while torrenting.
This method does require some additional configuration inside your torrent client, and should only be used with torrent clients that never ignore proxy settings when they are enabled. The best clients to use the SOCKS5 proxy with are:
- uTorrent
- Vuze
- QBittorrent
- Flud (Android)
What you need to know before setting it up:
1: For security reasons, your proxy password is different than the VPN password
Don’t worry, we’ll show you how to get the proxy login details later in this tutorial. Just make sure you don’t skip that step or you won’t be able to connect properly.
2: This method is best used with the VPN
The proxy doesn’t have any encryption itself, it only changes your IP address. While your torrent client does have a built-in encryption feature, it’s really lightweight, may not encrypt the actual downloads, and will reduce your number of peers.
That’s why it’s why better to use the proxy and VPN together, for strong encryption with a 2nd IP change for privacy.
Step #1: Get your Proxy Username/Password
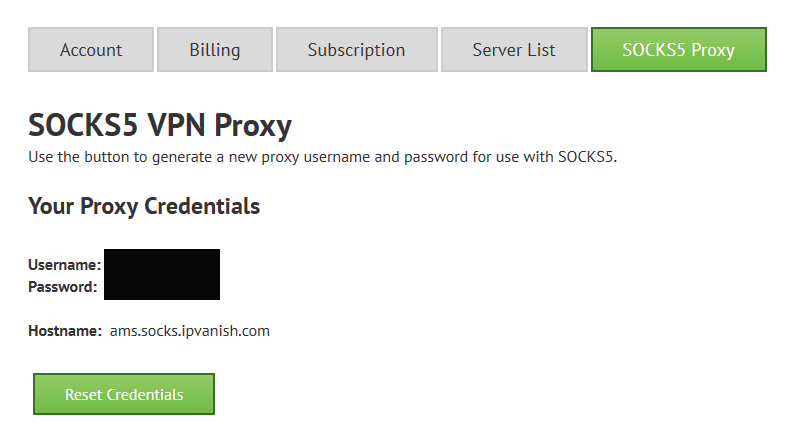
For security reasons (since an unencrypted proxy transmits passwords in cleartext) IPVanish generates one-off credentials that are unique so your VPN login details aren’t at risk.
- Log into your IPVanish control panel (w/ VPN Username/Password)
- Go to the ‘SOCKS 5 Proxy’ tab
- Find your login details there. You can ‘Reset Credentials’ to generate new login details any time you want.
- Keep this tab open so we can copy the info for the next step (setup)
Step #2: Configure the proxy in your Torrent Client
In this guide, we’re going to use QBittorrent for the demonstration.
Note: If you prefer uTorrent or Vuze, we’ve got the step-by-step instructions for those clients in our IPVanish SOCKS5 Torrent setup guide.
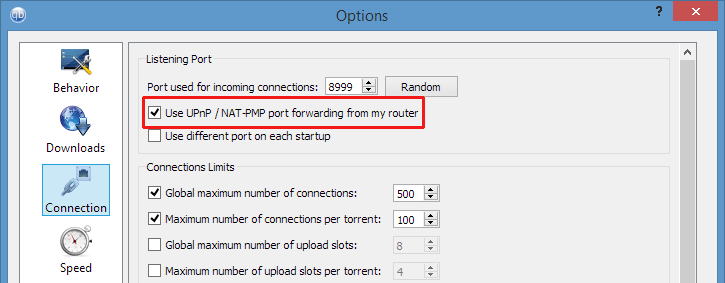
1. Go to Menu > Tools > Options > Connection
2. Enable UPnP or choose a specific port to forward
You can either enable Universal Plug ‘n Play (UPnP) which will auto port-forward your torrent traffic to the correct port, or you can manually set up port forwarding for a specific port.
3. Configure the Proxy Settings
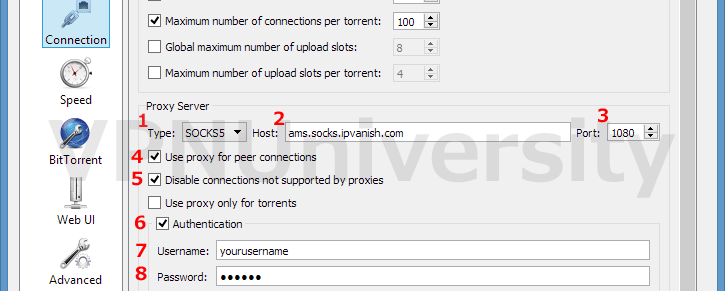
Still in the connection tab, scroll down to the ‘Proxy Server’ settings and enter the following:
- Type: SOCKS5
- Host: ams.socks.ipvanish.com
- Port: 1080
- Use Proxy for peer connections: yes
- Disable connections not supported by proxy: yes
- Authentication: yes
- Username: Your proxy username
- Password: Your proxy password
Step #3: Test the proxy
It’s a good idea to check your torrent IP address using a special tracking torrent to make sure your proxy is working correctly. You can also download an open-source test torrent like this one. If it downloads, you should be good to go.
Note: It’s also a good idea to restart your torrent client after applying the proxy settings.
Wrapup and additional resources
If you’re an IPVanish subscriber, this guide contains everything you need to get set up for truly secure torrent downloads. But there are a couple other guides and tutorials you may want to check out.
Learn to setup a VPN on your router: Instead of having to manually start the VPN on your PC or smartphone, you can actually install openvpn on your compatible VPN router, and protect your entire network with a single connection. You can even Turn on a kill-switch and route specific devices inside/outside the VPN tunnel.
Learn about torrent encryption: Everything you need to know about built-in encryption (in your torrent client) vs. strong VPN encryption can be found in our Bittorrent Encryption Guide.
If you have any questions, suggestions, or random thoughts…please leave a comment below!



This worked perfectly! I followed another tutorial and almost wanted to give up. Your tutorial explained it nicely and I got it set up successfully. To anyone out there, you can find the SOCKS5 credentials from the actual IPVanish website, not from the client itself. Thanks again VPN University.