Using a Socks5 Torrent Proxy with your favorite Bittorrent client will allow you to easily anonymize your torrent traffic.
A properly configured proxy allows you to route 100% of your torrent traffic through a remote server, which will hide your real IP address from torrent peers, making your downloads much more anonymous.
But not all proxy services are created equal. And not all torrent clients handle proxy connections the same way.
That’s why we created this guide.
It’s pretty massive, so feel free to use the Jump Links below to find the exact section you’re looking for…
Contents
- Choosing a Torrent Proxy Service
- How to get your proxy username/password
- Private Internet Access
- NordVPN
- IPVanish
- Torguard
- Proxy setup guide for (separated by torrent client)
- uTorrent
- Vuze
- Deluge
- QBittorrent
- Verify your proxy is working properly
- VPN or Proxy: Is one better for torrenting?
- Torrent clients that don’t have proxy support
- ‘Torrent Proxy’/ Tracker Proxy Websites (to unblock torrents)
- Frequently Asked Questions
How to choose a proxy service for Torrents/P2P
First things first, you’ll need a subscription to a proxy service if you don’t have one already. And let me make two things very clear:
- Make sure to choose a ‘Zero-Log’ proxy service (for maximum privacy)
- It must be Socks5 and not http/https.
We’ll look in-depth at our recommended proxy services, as well as understanding the criteria of what makes one proxy better-suited for torrents. But for simplicity’s sake,…
These are the best proxies for BitTorrent:
- Private Internet Access (Socks5 + VPN included)
- NordVPN (Socks5 + VPN included)
- IPVanish (Socks5 + VPN included)
- Torguard (Socks5 + VPN sold separately)
Next, let’s take a closer look at each of these services.
Private Internet Access ($3.33/month)
Private Internet Access is the best deal available if you want a torrent-friendly Socks5 proxy & VPN service primarily for anonymous torrenting. PIA has the best combination of essential torrent features, for less than the cost of a cup of coffee per month.
Better yet, Private Internet Access allows 5 simultaneous connections and are the world’s only VPN who’s ‘No Logs’ privacy policy has been verified in court.
All plans include unlimited bandwidth on their Socks5 proxy server in the Netherlands.
Read: our Private Internet Access review
NordVPN ($5.95/month + Netflix Support)

NordVPN’s feature set is almost identical to Private Internet Access (Zero Logs, Socks5 + VPN, torrent-friendly). However, they have one awesome advantage… NordVPN is one of the only VPNs in the world that still works with Netflix. They’ve been able to successfully avoid the Netflix VPN block for years.
If you want 1-click access to Netflix’s global catalog from anywhere in the world, choose NordVPN.
Read: NordVPN review w/ Netflix unblocking SmartPlay technology
IPVanish ($6.49/month + Fastest VPN in the World)

IPVanish is a zero-log VPN service based in the USA. They fully allow torrents/p2p and include both Socks5 Proxy service and VPN service in one all-inclusive package.
A bit pricier than PIA, IPVanish is the undisputed king of speed, outperforming all contenders in our speed tests. Their software is also more user-friendly than both PIA and NordVPN. If you’re willing to pay for performance (and don’t need Netflix support) go with IPVanish.
Read: Our IPVanish review
How is a Proxy different from a VPN? And which is better?
This is a common question. In simple terms, a proxy is like a VPN, minus the encryption. In other words, a proxy will hide your IP address without scrambling/encrypting the data you’re sending.
But that doesn’t necessarily mean a VPN is better. You see, BitTorrent traffic is identified based on the IP address that appears in your torrent swarm, not by directly monitoring your data stream (which only your ISP can do).
However…
A VPN is certainly more secure, which is why most of the Socks5 proxies we feature in this article actually include Proxy + VPN service in the same subscription at no additional charge.
This gives you the option to use either (or both) to match your security needs. Many people opt to run a VPN 100% of the time for day-to-day security, and also configure a proxy just for their torrent software.
Proxy Advantages
Proxy Disadvantages
How to get your Proxy Login Information
Each of these companies has a unique method of assigning usernames/passwords for their proxy service. Each service also uses a unique proxy address and port number.
So make sure you use the correct settings for your provider.
Use the tabs below to select your proxy provider. We have instructions to find all the information you will need to configure your preferred torrent client:
- Username/Password
- Proxy Address/Hostname
- Port #
Private Internet Access proxy settings
PIA has a single proxy location, a high-speed SOCKS cluster located in the Netherlands. Here’s all the login details you need:
Hostname/Address: proxy-nl.privateinternetaccess.com
Port: 1080
Username/password: Different than VPN login (see below)
Private Internet Access requires you to use a different proxy username/password than for their VPN service. You generate your proxy credentials from inside your PIA account panel on their website.
- Login to your account panel on PrivateInternetAccess.com
- Scroll to the section labeled ‘PPTP/L2TP/SOCKS Username/password’
- Keep this page open for easy copy/paste into your torrent client

NordVPN proxy settings
NordVPN hosts their Socks5 proxies on the same servers as their VPN network. They allow SOCKS connections in over 40 countries, and 10 of these countries allow P2P/Torrent connections. The full server list can be found here.
Proxy Hostname/Address: See below, to pick a server and get hostname
Port: 1080
Username/Password: Same as VPN credentials
To pick a P2P proxy server and find the Hostname:
- Go to the NordVPN Server List
- Scroll to the ‘P2P’ section
- Choose a country location. We recommend: Netherlands, Canada, Switzerland, Luxembourg
- Click ‘Show Server’ to expand the server list for that location and view the proxy address
- Choose specific server and copy the Address. We used ca19.nordvpn.com
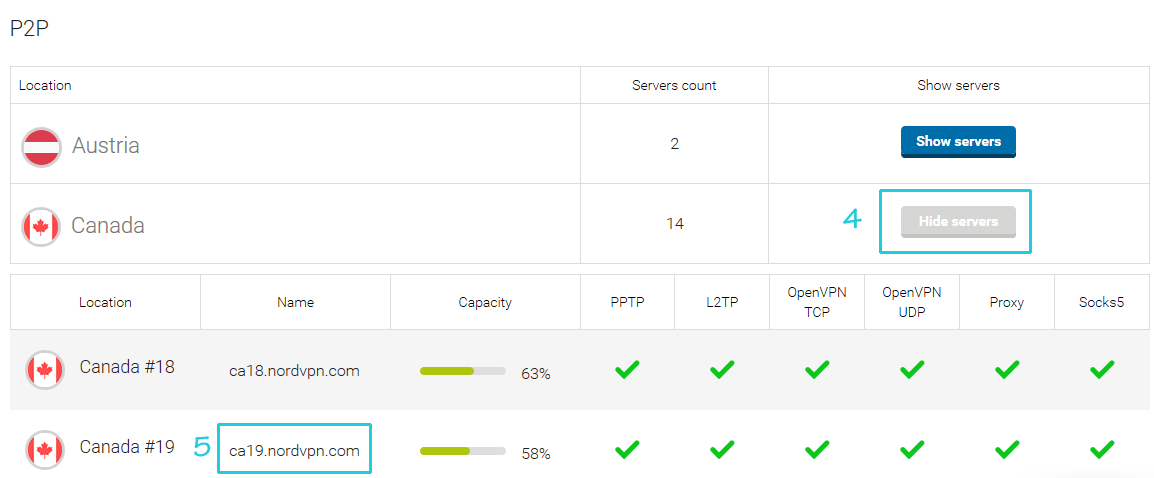
The Port # is 1080 for all server locations. Proceed to the next step with setup instructions for your specific torrent client.
IPVanish proxy settings
IPVanish has one massive proxy cluster located in the Netherlands. To login, you must use a specific proxy username/password that is different from your VPN credentials. Instructions below…
Hostname/Address: ams.socks.ipvanish.com
Port #: 1080
Username/Password: Generated from account panel – Instructions.
Once you have your socks username and password, proceed to the next step to setup IPVanish with your preferred torrent client.
Torguard has several locations for their p2p proxy service. You can manually choose a server by its IP address (shown in your Torguard account panel) but we recommend using the default proxy address and let Torguard choose the fastest server automatically.
Hostname: proxy.torguard.org (or proxy.torguard.io)
Port #: 1080, 1085, 1090 (your choice)
Username/Password: Emailed to you when you signed up for Torguard
About the Hostname: it doesn’t matter whether you choose the .org or .io proxy address. Both belong to Torguard’s ‘Smart’ router, which will find the optimal proxy server for you based on your location and how crowded each server is.
Port: We love the fact that Torguard provides multiple ports that you can run the proxy on. Many VPNs (PIA and IPVanish for example) only allow you to run on the default 1080 port. The problem with this is that some internet providers (Comcast is one example) block all traffic on port 1080.
If you get slow speeds while using the proxy on 1080, choose 1085 or 1090 as your port # instead.
Proceed to the next section to get specific setup instructions for your preferred torrent client.
Configure your Torrent Client
We have proxy setup guides for the following torrent clients:
- uTorrent/Bittorrent
- Deluge
- QBittorrent
- Tixati (not 100% secure)
If your favorite client isn’t listed here, it most likely doesn’t support the proxying of peer connections. If this is the case, a VPN is your best option for improving torrent privacy.
Please use the tabs below to find our setup guide for your preferred client:
uTorrent/bittorrent proxy setup
uTorrent fully supports the proxying of peer and tracker communications. We’ll look at the recommend proxy settings. Afterwords we’ll discuss the (optional) port forwarding and encryption options.
To access uTorrent Proxy setttings:
Go to: Menu > Options > Preferences > Connections (tab on the left)
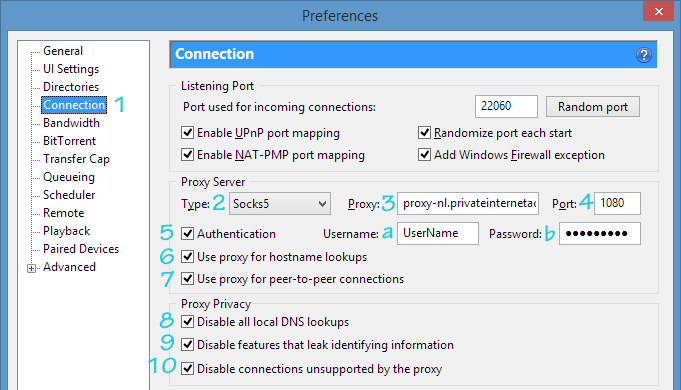
We’ll look at the important settings 1 by 1. They’re numbered as in the illustration:
[1] Connection Tab: Select the ‘Connection’ tab of the preferences menu to access the proxy settings.
[2] Proxy Type: Choose ‘Socks5’ from the dropdown menu (true for all the VPN/proxy services in this article)
[3] Proxy: This is the proxy address assigned by your torrent proxy service. This was covered in the previous step.
[4] Port: The port # your Socks5 proxy uses. It’s 1080 for PIA, IPVanish, NordVPN. Torguard uses 1080, 1085, or 1090
[5] Authentication: Check this box in order to enter your username/password
[5a, 5b] Username/Password: Specific to your proxy service. You should have copied/generated your login credentials in the previous section.
Important: Make sure you have all boxes numbered 6-10 checked. These are important privacy settings that will make sure that uTorrent uses the proxy tunnel for ALL connections. You don’t want to leak identifying information to trackers or torrent peers.
[6] Use Proxy for Hostname Lookups: Make sure that tracker requests are routed through the proxy tunnel and proxy IP address.
[7] Use proxy for Peer Connections: All peers in a swarm will see your proxy IP address
[8] Disable Local DNS lookups: Prevent DNS leaks and make sure that uTorrent uses the proxy servers’ DNS servers, not your own (prevent IP leaks).
[9] Disable Features that leak identifying information: Turns off any uTorrent features that could accidentally leak information about your identity, location, or real IP address. Important for maximum privacy.
[10] Disable Connections unsupported by the Proxy: Some torrent clients will route ‘unsupported connnections’ outside the proxy tunnel. uTorrent is much more secure and lets you disable any unsupported connections. This ensures that 100% of your uTorrent traffic is routed properly through the proxy tunnel and your true IP address is never exposed.
uTorrent Encryption & DHT Settings
These settings will let you enable (optional) protocol encryption. This is a weak (but fast) encryption algorithm designed to obscure your torrent traffic as it passes through your ISP’s servers and prevent throttling/blocking. You can also turn off DHT, but DHT is required for magnet links to function so we recommend you leave it on.
Access these settings at: Menu > Options > Preferences > BitTorrent (tab)
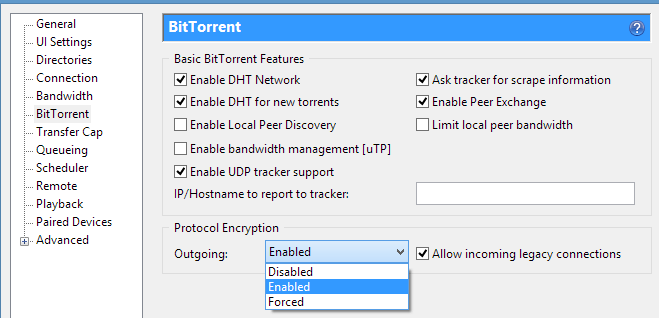
Enabled: This setting will allow you to encrypt connections between any peers that also have encryption enabled. It will still allow unencrypted connections to non-compatible peers. Access to 100% of available peers.
Forced: Forced mode requires that all peer connections be encrypted. You can only connect to other peers in ‘Enabled’ or ‘Forced’ mode. This mode is more secure, but will likely reduce your total number of available peers. This usually isn’t an issue but could make it hard to download torrents with few seeders.
You should also read: How to use uTorrent like a PRO
How to setup a Proxy in Vuze/Azureus
Vuze has selective support for proxied connections. Vuze does not support peer connections via HTTP(s) proxies at all, though we’re only using SOCKS5 proxy services in this guide.
Vuze supports UDP tracker connections (not peers connections) and allows outgoing peer communications via TCP. For more info, see their Socks proxy wiki.
Bottom Line: A Socks proxy does work with vuze and can anonymize peer communications (if set up properly). However most users would be better off using a VPN instead, as it is much more secure for downloading torrents safely with Vuze.
Step #1 – Put Vuze in ‘Advanced’ mode
In order to access the Vuze proxy settings, you first need to put Vuze in ‘Advanced’ user mode:
Open Vuze and go to: Menu > Tools > Options > Mode (tab)
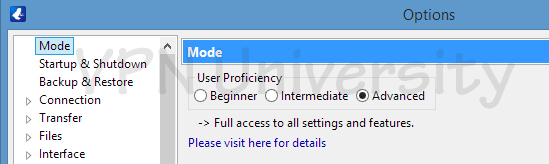
Then hit click the ‘Toggle’ icon to the left of the ‘Connection’ [1] tab and choose ‘Proxy’ [2] from the dropdown menu to bring up the proxy settings.
Here are the important settings to change:
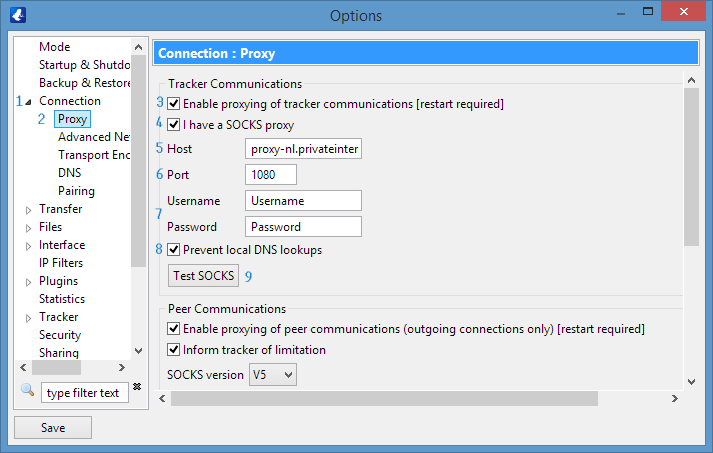
Step #2 – Tell Vuze to use proxy for trackers and peers
Tracker Settings
Enable Proxying of Tracker Communications [3]: Torrent trackers you connect to will use the proxy tunnel and see your anonymous proxy IP address. Make sure to restart Vuze for this setting to take effect.
I have a SOCKS proxy [4]: Lets Vuze know you’re using a Socks proxy, not HTTP. This is important because you can only use a Socks proxy for peer connections.
Host [5]: Your proxy hostname/address (provided by your proxy service and discussed in the previous section)
Port [6]: The port number your proxy runs on. Most use the default 1080.
Username/Password [7]: Your own proxy login credentials. Make sure you generated unique proxy credentials if your proxy requires it.
Prevent Local DNS Lookups [8]: Check this box to make sure all DNS requests go through the proxy tunnel (prevent DNS leaks).
Test Socks [9]: After you’ve entered and double-checked your proxy settings, click this button to have Vuze attempt a connection through the proxy tunnel. This will let you know whether things are configured properly.
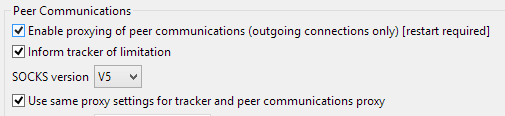
Vuze Peer Proxy Settings
It’s also essential to enable the proxying of Peer communications in Vuze. Check all the boxes as shown below, and make sure to choose ‘V5’ as the Socks version.
Vuze Encryption (optional)
If your Internet Provider deliberately blocks or throttles torrent traffic, you can use Vuze’s built-in encryption to disguise your torrent data. If your ISP is using more advanced DPI inspection/torrent-blocking technology, you’ll be better off running Vuze through the VPN tunnel (instead of the proxy).
To change your Vuze encryption settings go to:
Menu > Tools > Options > Connection (toggle) > Transport Encryption [1]
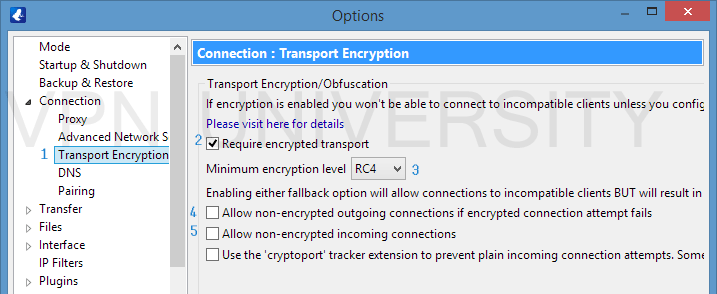
Require Encrypted Transport [2]: Check this box to enable encryption.
Minimum Encryption Level [3]: Set this to RC4 (strongest)
There are two modes you run Vuze encryption in…
Forced Mode (only allow encrypted connections): Leave boxes [4] and [5] unchecked to make sure you only allow encrypted connections.
Enabled Mode (allow encrypted and unencrypted peers): Check boxes [4] and [5] to use encryption when available but still allow unencrypted connections if necessary. This is less secure but will give you access to 100% of peers sharing a file.
Deluge Proxy Setup
Deluge has the better proxy support than almost any competing torrent client. They allow you to proxy all of the most important torrent connections, including:
- Trackers
- Web Seeds
- DHT/Peer-exchange
- Peers
Note: You have to choose a proxy server for each of these, but you can use the same proxy for all connections. You just have to set it up 4 times as we’ll show you.
Step #1 – Configure Deluge Proxy Settings
To access Deluge’s proxy settings, go to:
Edit > Preferences (or Ctrl+P) > Proxy (tab)
It’ll look like this:

We’re going to change all 4 of these sections to have the exact same proxy settings. Here are the settings you’ll want:
Type: SocksV5 w/ Auth (allows you to enter username/password)
Username/Password: Your login credentials. Provided by your proxy service or generated from your VPN account panel (PIA & IPVanish).
Host: Proxy address your provider uses (e.g. proxy-nl.privateinternetaccess.com or ams.socks.ipvanish.com etc)
Port: The port # your proxy uses. Most use the default port of 1080
Here are the completed proxy settings, using Private Internet Access as an example. Replace the appropriate settings with your own proxy services’ settings.

Step #2 – Setup Encryption (Optional)
You can choose to enable encryption on Deluge if you believe your ISP is blocking/throttling/slowing torrent traffic.
Go to: Edit > Preferences > Network (Tab)
Then look to the bottom of the window for the section labeled ‘Encryption’.
Deluge gives very fine-grained control over what portion of the torrent protocol to encrypt and whether to force encrypted connections or just use them when available.
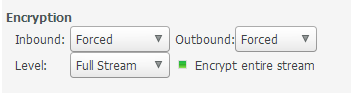
Here are the two most common modes we recommend:
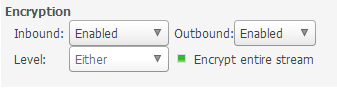
Forced, Full-Encryption Mode:
- Inbound: Forced
- Outbound: Forced
- Level: Full Stream
- Encrypted Entire Stream: Checked
When setup properly, it will look like this:
Encryption ‘Enabled’ Mode
This mode will allow you to use as much encryption as your peers allow. It will still use insecure connections if there are not enough encrypted peers available.
- Inbound: Enabled
- Outbound: Enabled
- Level: Either
- Encrypt Entire Stream: Checked
Settings should match these shown here…
That’s it, your Deluge torrent proxy is all set up. Proceed to the next section on testing your proxy setup.
QBitTorrent Proxy Setup
QBittorrent has excellent proxy support (much like Deluge). They allow proxying of both peer and tracker connections, effectively hiding your IP address from both.
Step #1 – Change your QBittorrent proxy settings
Go to: Tools > Options > Connection (tab) [1] > Proxy server (section)
In the ‘Connection’ tab of the QBittorrent options menu, you’ll see the proxy settings towards the bottom.
The image below shows a proper setup using Private Internet Access. You’ll want to insert the correct host, port, username/password for your proxy provider.
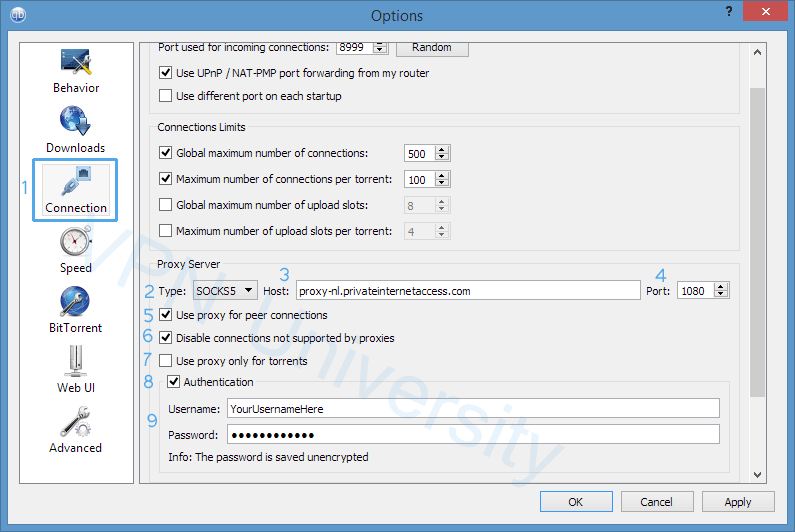
- Type [2]: SOCKS5
- Host [3]: Your proxy’s host address
- Port [4]: Port number your proxy operates on. Most use the default – 1080
Use proxy for peer connections [5]: Check this. It ensures that all connections peers are routed through the proxy tunnel (so they can’t see your real IP address).
Disable Connections not supported by proxies [6]: Check this. We don’t want QBittorrent routing any connections insecurely.
Authentication [8]: Make sure to check this box so you can enter your proxy username/password
Username/Password [9]: Provided by your proxy service
Step #2 – Add Encryption (Optional)
Deluge has built-in support for protocol encryption. This may allow you to prevent your ISP’s attempts to block/throttle/slow your torrents. This probably won’t defeat more sophisticated DPI torrent-blocking, in which case you’re better off using a VPN.
To change the Deluge Encryption Options go to:
Tools > Options > Bittorrent (tab)
Look for the single line labeled ‘Encryption Mode’.
There are three choices:
- Disable Encryption: Never use encryption
- Prefer Encryption: Use encryption as often as possible (whenever enough encrypted peers are available)
- Require Encryption: Only connects to encryption-enabled peers. This may reduce your overall number of peers you can connect to, but you will have 100% full-time encryption.
That’s it! QBittorrent is all setup. Proceed to the ‘Check your settings’ section.
Other Torrent Clients
What about other torrent clients? Can you use a proxy with Tixati, Frostwire or Transmission?
Answer: The short answer is no. Transmission (one of the most popular Mac clients) doesn’t support proxies at all. Tixati does include proxy settings, but if the proxy goes down it will route your torrents through the unsecured tunnel (bad).
Frostwire doesn’t work correctly with proxies either.
The same is true of the web-based torrent clients like uTorrent web, as well as most android torrent apps other than Flud and tTorrent.
Bottom Line: Vuze, Deluge, QBittorrent and uTorrent are the only multi-platform clients with full proxy support. If you’re using any other torrent software, you should get a VPN instead.
How to verify your proxy is working
Each torrent client handles failed proxy connections differently. Some will just route torrent traffic through your regular connection (bad). Others won’t connect at all until you insert the correct proxy settings (good).
Either way, you’ll want to check your torrent IP address to verify that your peers can only see the proxy servers’ IP address, not your own.
We’ll do this with a free tool that lets you download a custom magnet link and add it to your torrent client. Then, the tool reports what IP address you’re showing to peers, and you can compare it to your web-browser’s IP address.
This method works with all torrent clients.
Step #1 – Go to checkmytorrentip.upcoil.com
Step #2 – Download the Tracking Torrent [Fig. 1]: You can either copy simply download the magnet link or copy and paste the magnet link address into your torrent client.
Step #3 – Verify: Wait a bit (5 seconds to 1 minute) and if the proxy is working correctly you should see it pop up on the tracker page along with your new proxy IP address [Fig. 3], which should be different than the IP address you accessed the page with. [Fig. 2]
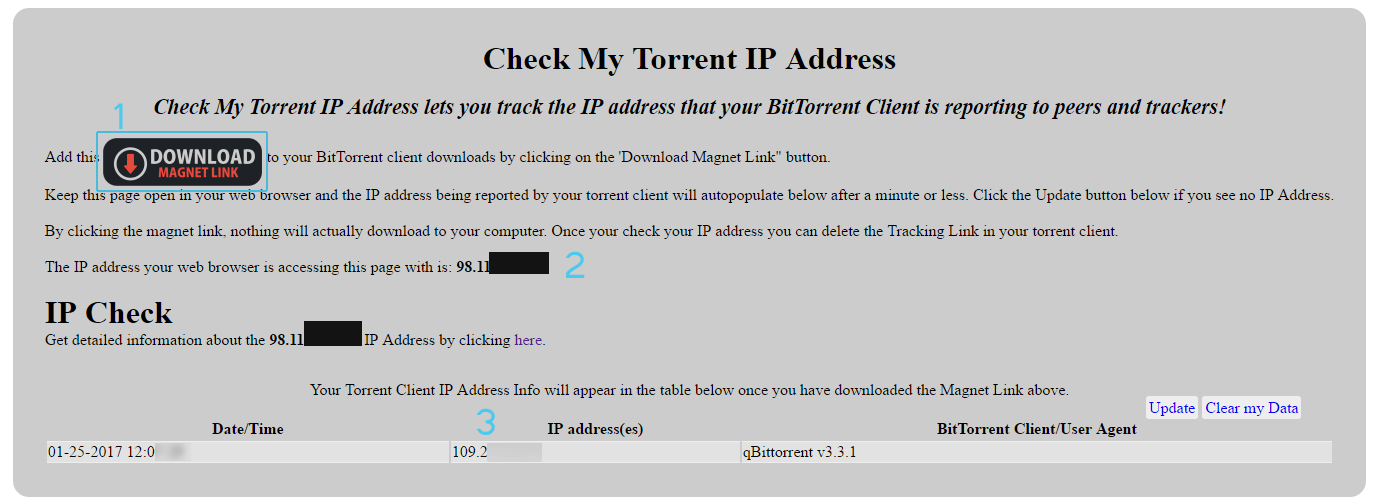
Step #4 – View your proxy IP address in your Torrent client: You don’t have to save this magnet hash# or bookmark the page for future tracking, you can actually see your current torrent IP address by viewing the ‘Trackers’ tab of the tracking torrent in your torrent client.
Screenshots from uTorrent and QBittorrent:

That’s it. Basically all you’re checking for is that your torrent client is using the proxy IP address. It should be different than your web browser’s IP address.
At this point your proxy setup should be complete, but we’ll go in-depth on some additional considerations in the sections below.
For more detail read: How to check your torrent IP address
Is a VPN better than a Proxy?
Not necessarily, and many people use both together.
The majority of people use only a VPN for private torrenting. The main reason is simplicity. There is no in-client configuration required to use a VPN, it just works. The other main VPN advantage is encryption.
While all the top torrent clients have a built-in encryption option, this is lightweight (not strong) encryption and depends on other peers having encryption enabled also. So if you want to make 100% sure your ISP cannot see your torrent traffic, use a VPN.
That said, 99.9% of torrent monitoring is done based on your IP address (which a proxy hides) not traffic monitoring. Most ISPs could care less what you’re downloading.
And a proxy has several advantages of its own…
Advantages of a proxy
- No encryption: Encryption is a valuable security tool, but it’s also slow. Your data must be run through an algorithm (sometimes 100+ times) both when it is encrypted and decrypted. This results in slower speeds. By using a proxy, you can hide your IP address from torrent peers, but still keep nearly 100% of your internet speeds. A VPN will usually be slower.
- Your browser address and torrent IP address are different: This makes it much harder to link the download of a .torrent file to the download of the actual underlying files (after you open the .torrent file in your client). Since each will be downloaded from a different IP address and there is no link between the two (assuming you followed our advice and chose a provider that doesn’t keep any logs).
And if you want the advantages of a proxy, but also want the strong encryption of a VPN…just use both!
Configure the proxy inside your torrent client as normal, but make sure to start the VPN before you open your torrent software. Then, the torrents will run through the VPN & proxy tunnel.
By using both a VPN + Proxy:
- Your torrents will be secured with extremely strong encryption (your ISP cannot see your downloads)
- Your browser IP address and torrent IP address will both be unique
And since all of the services we featured in this article allow at least 3 simultaneous connections, you can do all of this with a single subscription. Nice right!
Torrent Clients that don’t support Proxy connections
There are several prominent clients that don’t handle proxy connections properly (will route them insecurely). Several also will only proxy tracker communications, not peer communications (much more important).
As a result, you should always use a VPN (not a proxy) with:
Proxy Websites
The term ‘Torrent Proxy’ has another meaning as well: shorthand for specially websites designed to workaround torrent-site blockades. A so-called tracker proxy will fetch the contents of a popular torrent website on your behalf, which you can access from a different (unblocked) domain.
Almost all of the world’s most popular torrent websites have 1 or more proxies.
These include:
- Mininova
- Kickass Torrents (no longer exists)
- The Pirate Bay
While these proxy sites work in the short-term, it’s just a temporary solution. Most will eventually find themselves blocked or taken down as part of expanding blockades.
The best solution to unblock torrent sites (or any blocked website) is to use a VPN. Period. Learn how.
Frequently Asked Questions
These are the most commons questions about using a proxy for bittorrent, and problems users may encounter. Feel free to ask additional questions in the comments below or on Twitter @vpnuniversity.
Got any questions? Let us know.
And Please SHARE this guide. It is the culmination of more than 20 hours of effort. Happy torrenting!