The OpenVPN protocol is now by far the most popular option for consumer-facing VPN services today. If you’ve subscribed to any of the 100 most popular VPN services in the world, odds are you’ve already been using OpenVPN (whether you know it or not).
But what many people don’t realize is that you can use any OpenVPN-capable VPN provider without using their proprietary software. In fact, OpenVPN.net has their own client software that works with any OpenVPN server, or provider.
This guide will walk you through the (simple) process of setting up your own OpenVPN connections with the OpenVPN GUI client for windows.
Guide Sections:
Why use the OpenVPN GUI?
Let me be clear… the OpenVPN GUI software is not faster, easier to use, or loaded with more features than the custom client your VPN provider probably offers you. In fact, the GUI (Graphical User Interface) doesn’t have any fancy features, bells, whistles, or gadgets. It does only one thing, create a secure VPN tunnel.
So why the heck would anybody choose to use it over a feature rich custom VPN client like VyprVPN’s?
Transparency, trust, and control. That’s it.
The downside of your VPN provider’s own custom software
Don’t get me wrong, I absolutely love many of the high-quality proprietary VPN clients out there. They add a number of features as an application layer on TOP of the OpenVPN protocol. This like kill-switches, WebRTC leak protection, smart server routing, and torrent-optimized connections wouldn’t be possible without proprietary software.
But there is one thing that (most) custom VPN client’s don’t have… Open-Source code.
They’re a black box, and honestly you don’t know what the heck they’re doing behind the scenes once you install the software. For example, a malicious VPN client could:
- Monitor all system processes and look for exploits
- Inject viruses, trojans, or malicious code into your computer
- Make your computer part of a botnet (this has already happened)
- Monitor all your web traffic or even access your laptop or smartphone’s webcam.
Now a reputable VPN’s software is probably doing none of these things. But it could, and you’d have NO idea.
So if you’re the careful type, it makes sense to use software with public (and exploit-free) source code so that trust isn’t an issue. Sure, you trade-off some functionality but if you’re the cautious type it may definitely be worth it.
Other reasons to try the OpenVPN GUI
- Simplicity: Since there’s no extra features or settings, there’s no real way to screw things up. You can have a VPN connection in 1 click, and that’s all that most people need. Things like DNS leaks can be solved at the device or router level.
- No Other Option: Not all VPN providers have their own software, especially smaller companies. It’s really expensive to develop a custom VPN client, and there’s always the risk of security flaws so why not let your subscribers use one that already exists.
- Robust Security: Because the code is audited and vetted, it’s MUCH less likely that a major security flaw will be found in the OpenVPN GUI compared to a 3rd-party VPN client. In fact, one study found that a huge percentage of Android VPN apps had major security flaws (or weren’t even encrypting data at all!)
How to Setup the OpenVPN Client GUI
It takes less than 5 minutes to complete the setup and create your first VPN connection. Make sure you have your VPN provider’s login details online so you can download the config files and connect to the VPN server. If you don’t have a VPN subscription yet, we recommend IPVanish or NordVPN.
Related: How to choose a VPN provider (in-depth guide)
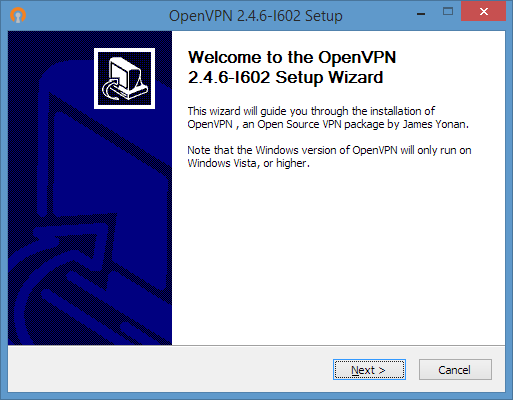
Step #1: Download and Install the OpenVPN GUI
The GUI client is bundled as part of the entire OpenVPN package which includes TAP drivers as well as the OpenVPN server framework (which you won’t need to use).
Navigate to the OpenVPN download page:
Choose an installer type (Gzip, Tar, or Windows installer):

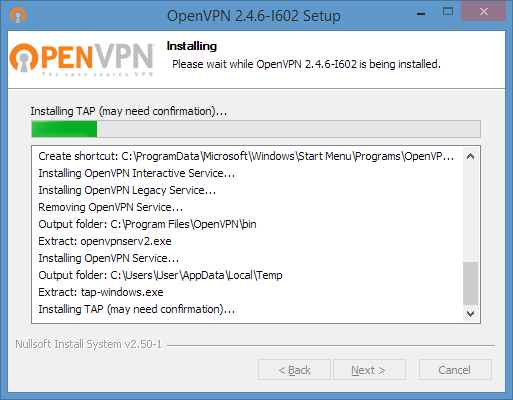
Unzip & Run the installer
Launch the installer and then click ‘Next’ to choose the installation options. You’ll want to make sure the TAP drivers and GUI are included in the install. You can also choose to associate all .ovpn files with the OpenVPN client.
Step #2: Download the .OVPN configuration files
You can’t run the GUI yet because it’ll just give an error message since you haven’t added any .ovpn config files. An .ovpn file basically a small text file that contains information about a specific VPN connection to a specific server. It contains information like:
- The IP address of the server
- What encryption cipher should be used
- What encryption strength should be used
- How to authenticate the data packets
- How to handle dropped connections
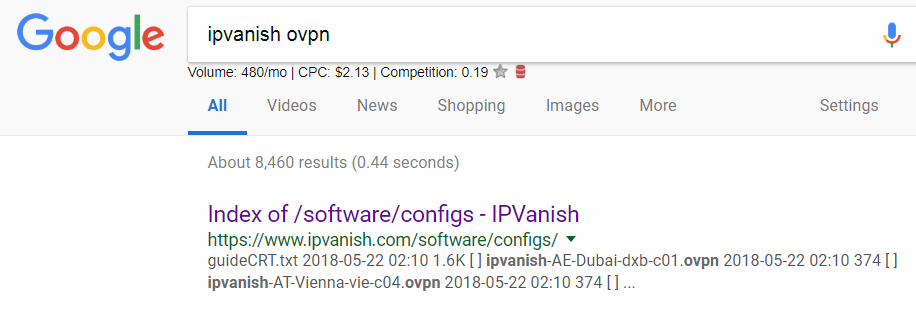
Download the .ovpn config files for your specific VPN
Each VPN provider has their own VPN config files. You’ll usually download them inside your account panel, or search your providers help documentation for a link. We’ll be using IPVanish for this example. As of publication, here are the links for the most popular VPNs.
| VPN Provider | Config File Link |
| ExpressVPN | download in account panel |
| IPVanish | OpenVPN download page |
| NordVPN | https://nordvpn.com/ovpn/ |
| Private Internet Access | https://www.privateinternetaccess.com/openvpn/openvpn.zip |
| VyprVPN | VyprVPN OpenVPN Configuration |
When in doubt try google:
“VPN Provider Name” + “ovpn”
What to download:
- The entire zip file with all configs (or…)
- The individual .ovpn configs for locations you want to use
- the CA (.crt) certificate file if your VPN uses one.
Step #3: Copy the .ovpn files to the OpenVPN directory
Once you’ve downloaded the configuration files, we have to copy them to the /config/ folder of the OpenVPN directory (where you installed OpenVPN).
Note: The OpenVPN GUI only supports a maximum of 50 config files, so only copy files for servers you actually plan to use. Some VPNs have literally thousands of different configs. So choose a few you want. The file names usually include the location (country or city) to make it easy to find the right ones. You’ll also need to choose whether you want to use TCP or UDP connections.
By default, the folder for OpenVPN is C:\Program Files\OpenVPN and you’ll want to locate the \config\ directory at that path and copy the files there.
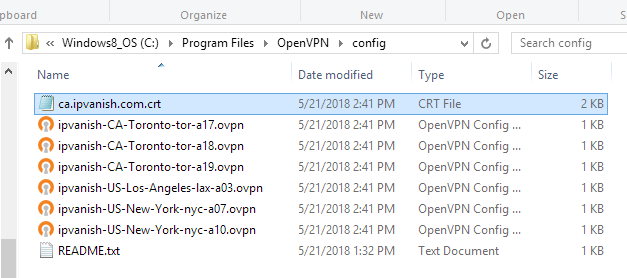
If the config package from your VPN also includes a .crt Certificate Authority file, you’ll want to copy that as well. If you don’t, you’ll get an error later when trying to connect. If your VPN doesn’t provide a CA .crt file, don’t worry. The certificate is embedded in the .ovpn file and you don’t need a separate one.
Step #4: Test your OpenVPN connection
1- Run the OpenVPN GUI from the start menu
2- Check the system try for the OpenVPN GUI icon (you may have to expand it)
3- Right-click the GUI icon to show the server selection menu
4- Choose a server from the list
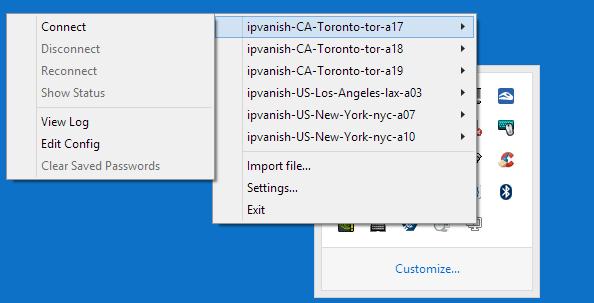
5 – Enter your username/password when prompted.
You can also choose to ‘Save the password’ for next time. You’ll have to do this once for each .ovpn file you added to the /config/ directory.
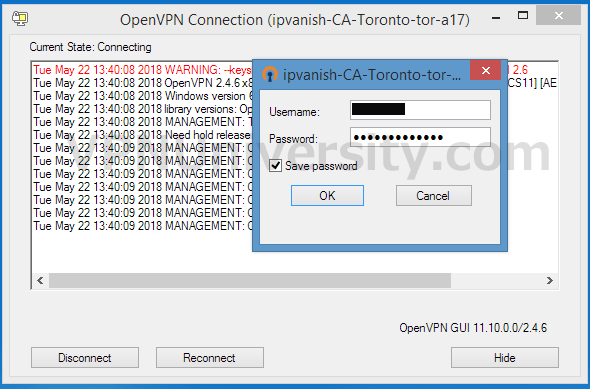
6- Check your connection status
Once you’re connected, the GUI icon in the system try should show green and display your newly-assigned VPN IP address. If everything is working as expected, you’re all set! If you’re having any issues, check out the troubleshooting section below.

Troubleshooting
There are several common errors you may encounter if you miss a step in the setup process. Don’t worry, we’ve got the fix for each of them.
No readable connection profiles (config files) found.

In order to connect to a server, you need to store the configuration (config) information in a .ovpn file and put it in the \config\ folder of the OpenVPN software. Your VPN service will provide these files to you.
Connecting to management interfaced failed
If you receive this error, you’ll be referred to the log file for more details. This can be found at \OpenVPN\log\
The most common cause is that your VPN provider doesn’t include the CA certificate authority text inside the OpenVPN config files and instead requires a separate .crt file to be placed in the config directory. Usually this file will be packaged with the .ovpn files in the zip archive. If not, contact support or check your provider’s documentation. Then simply copy the file into the \config\ folder.
Wrong credentials
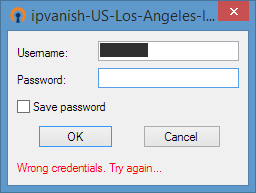
If you the ‘Wrong credentials’ error, it means you’ve mixed up (or mistyped) your Username or Password. Doublecheck your records (or do a password reset if you’ve forgotten it) and try again.