Ok, so you got yourself a VPN. But how do you know it’s working properly? Is the encryption working? Is it leaking your IPv6 address? And what kind of speed dropoff can you expect?
This is our VPN testing guide, which will teach you how to test and optimize your VPNs performance.
Topics:
- Verifying your connection status
- Is your VPN encrypted
- Check for Leaks
- DNS Leaks
- IPv6 Leaks
- WebRTC leaks
- Speed Testing
You’ll also want to check out our VPN leak guide which goes in-depth on the most common VPN privacy leaks and how to fix or minimize them.
Checking your VPN connection
- Why: Some VPN clients may show you’re connected when you really aren’t. This can happen because of a bug, poorly written software, or even fraud.
- How: Check your IPv4 address to see if it’s changed, and that the location approximately matches the VPN server’s location.
Why you should check/verify your VPN connection
It’s a good idea to verify your VPN connection status, especially if you’re using a new VPN provider or the client software has been recently updated. In our testing, we’ve seen way too many times where the VPN software showed an ‘active’ connection, but the VPN logs actually showed a failed connection.
This means you may think you’re protected by the VPN when you’re actually not (bad).
How to check your VPN connection
- Disconnect from your VPN
- Go to IPVanish’s IP-check tool
- Check your current IP address
- Connect to the VPN
- Refresh the page
- Verify that your IP address and location has changed
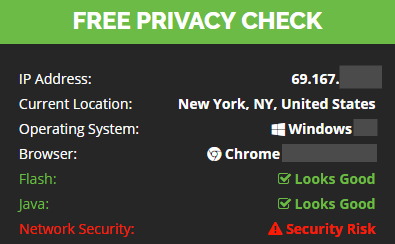
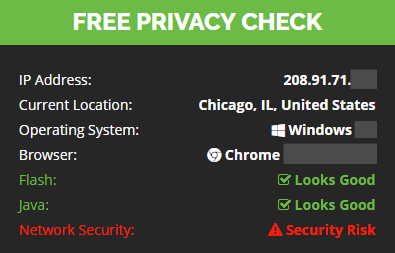
How to Verify: Your IP address should be completely different when connected to the VPN server. Specifically this is your IPv4 address. Also, your detected location should be different (assuming you’re using a VPN server in a different state/country). However the location is not an indicator of your connection status. The change in IP address verifies a successful connection.
Tip: You can safely ignore the ‘Network Security’ warning on IPvanish’s tool. It only checks if you’re using their VPN service. Not whether you’re using a VPN at all.
How to verify the VPN is encrypting your data
You’ll be shocked to learn that some so-called VPN providers don’t even bother to encrypt your data in-transit. In fact a research study of over 300 Android VPN services concluded 18% of these apps weren’t even encrypting data (the whole point of a VPN).
So it’s a good idea to verify your VPN is encrypting data as promised. Here’s how…
There are two options for verifying your VPN is encrypted:
- Glasswire: (easy method, but not 100% guarantee)
- Wireshark: Involves inspecting actual transferred packets. Harder, but 100% verified encryption.
Both apps are free and available on for both Windows and Mac/OSX
Glasswire (the shortcut)
Glasswire is a free network diagnostic tool that will tell you what types of traffic each active app/program is sending. So you can quickly see if your VPN is sending HTTPS/SSL Traffic (Encrypted) or regular HTTP traffic (unencrypted).
This shortcut assumes that all HTTPS/SSL traffic is actually encrypted without actually inspecting the packets themselves. This almost always true, so all but the most paranoid should be happy with the easy method.
How to check your VPN is encrypted (w/ Glasswire)
- Download and install Glasswire
- Run the Glasswire
- Connect to your VPN
- Download a file or watch a youtube video to generate traffic
- Go to the ‘Usage’ tap
- Select the ‘Apps’ view from the submenu
- Look for ‘OpenVPN Daemon’ in the app list (if you’re using OpenVPN)
- Verify that the active traffic type is ‘OpenVPN’
As you can see in the image below, IPVanish sent/received all but 2KB of traffic (99.99%) over SSL/HTTPS. That first little unencrypted bit is the VPN handshake (before encryption starts) and shouldn’t increase over time as you use the VPN.
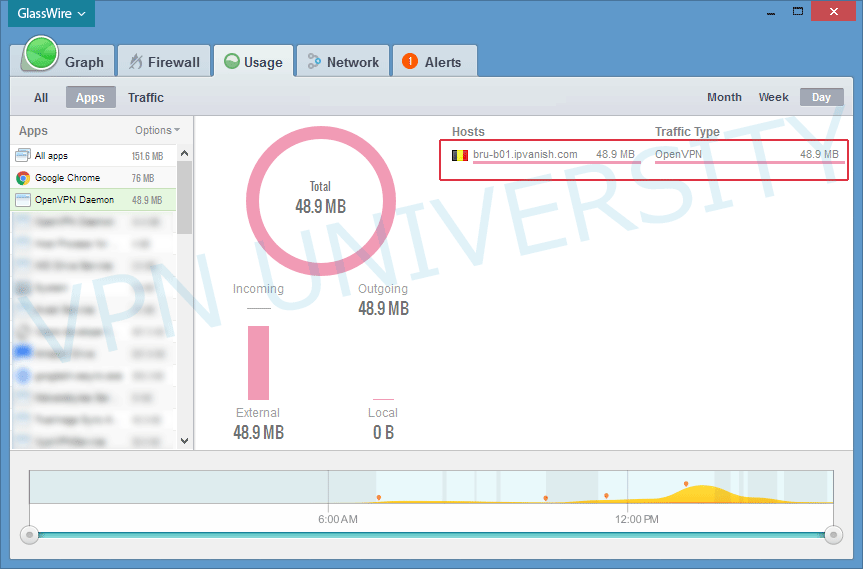
We can likely conclude that IPVanish is routing traffic securely through an encrypted OpenVPN tunnel.
Wireshark (most accurate method)
Wireshark is the most accurate way to verify your VPN is encrypting data because it involves inspecting the actual data packets your computer is sending/receiving. You can see with your own eyes whether the data is obfuscated or in easily-readable plaintext.
For this method, you’ll need to download and install Wireshark. There are 32-bit and 64-bit versions for Windows as well as a Mac/OSX version. It’s free.
How to check your VPN is encrypted (with Wireshark)
- Start your VPN
- Open Wireshark
- Choose your network interface (Wifi or Ethernet) to record
- Start recording
- Look for packets with a where the ‘Protocol’ is ‘OpenVPN’
- Right click an OpenVPN packet and choose ‘Follow…UDP/TCP stream’
- Examine the full stream to make sure it’s encrypted (looks like gibberish)

Here’s the entire OpenVPN stream shown continuously:
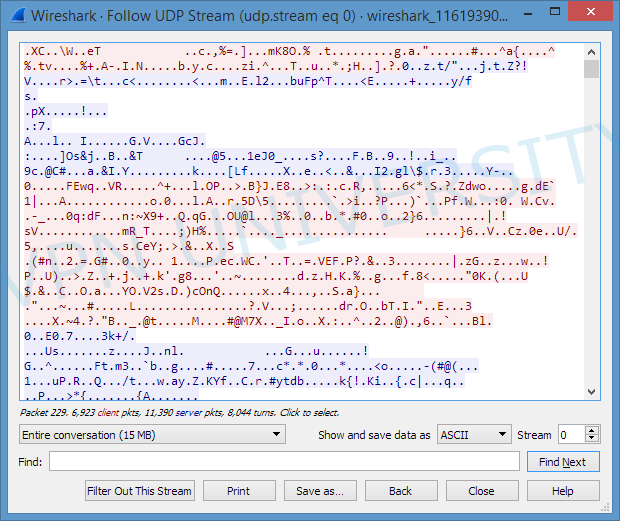
Don’t worry if you have other packets that aren’t OpenVPN. These are usually packets sent within your own network, like between your computer and router or printer. They won’t be encrypted by the VPN.
Checking your VPN for IP Leaks
Aside from encryption, the other biggest advantage of a VPN is that it hides your real IP address, allowing you to use the public address assigned by the VPN server instead. But there are several types of VPN privacy leaks that can expose your real IP address or browsing history.
They are:
- IPv6 Leaks
- WebRTC/STUN leaks
- DNS Leaks
We wrote a complete guide on fixing each of these leaks, but here’s the short version:
IPv6 Leaks
Your devices now have both an IPv4 (standard) IP address as well as a new IPv6 address. Many VPNs only support IPv4 traffic and could route IPv6 traffic insecurely (outside the VPN tunnel). This could expose your true identity or location without your knowledge. There are two options (we recommend doing both):
- Choose a VPN with IPv6 leak protection (PIA, NordVPN, IPVanish)
- Disable IPv6 traffic on your router or computer (Windows / Mac)
WebRTC/STUN
WebRTC is a protocol that lets your web browser control peripherals like a webcam. But it can also be used maliciously to trick your browser into exposing your non-VPN IP address. The only solution is to disable WebRTC in your specific browser.
DNS Leaks
Your computer uses DNS (Domain Name System) requests to translate domain names (like vpnuniversity.com) into numerical IP addresses. DNS is like a phonebook for the internet. But your ISP tries to intercept DNS requests and route them to their own DNS servers (allowing them to spy on your browsing history).
Due to a vulnerability in the DNS protocol, some VPNs allow this unless their software takes step to block DNS leaks and force the VPN to only route DNS lookups to secure DNS servers.
Solution: Choose a VPN with DNS leak protection. Specify your own custom DNS servers on your router (optional).
Testing VPN Speed
Once you’ve verified your VPN is secure and plugged all potential privacy leaks, it’s time to test your VPN’s performance. And this means speed.
Pro Tip: You should expect some dropoff in speed when using a VPN. How much depends on a variety of factors, including server load, distance, and the strength of encryption used.
Recommended Speedtests
There are a number of web-based speed tests that will check how fast your current connection is. They are not all created equal, however, and each uses a slightly different methodology. For example, some flash-based tests don’t download a file at all and rely on your web browser to tell the server how fast it is (not that accurate).
The best speedtests we’ve found are:
Methodology
If you’re try to verify your real-world speed, you’ll want to leave your internet connection setup just as you normally would. So if you usually use your device on Wifi, stay on Wifi for the speedtest as well.
Tips:
- Use the same speedtest with and without the VPN
- Test at least 2 times with and without to get an average speed
- Test using the same VPN server/location you will use most often
You can also do a more real-world usage test by manually downloading a large file from a fast server. Well seeded torrents like a popular linux distro work quite well for this purpose too.
Warning: Don’t be shocked by the speed loss. It will be even more dramatic if you have a superfast connection normally. Even high-quality VPNs can typically only handle 50-100mbps speeds under good conditions. We have some tips to maximize speeds though.
Understanding Speedtest results:
Here’s sample speedtest result from speedtest.net using VyprVPN:
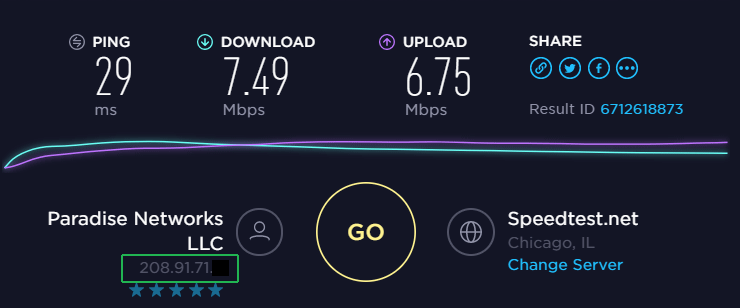
The important things to pay attention to are:
- Ping: How long it takes data to travel between you and the speedtest server in milliseconds. This increases with distance.
- Download Speed: Speed in Megabits per second
- Upload: Speed in Megabits per second
- IP address: Shown in the bottom left corner, this should match the IP address assigned by your VPN
Final Thoughts
This guide should help you quickly troubleshoot and eliminate any issues when testing a new VPN. It’s a good idea to focus on the common leaks first, like DNS/IPv6 leaks and the WebRTC vulnerability (which is your browser’s problem, not the VPN).
If you’re a bit more cautious, go ahead and test if the VPN is actually encrypting data. This may be worthwhile with less-known or free VPN services, which have been caught misrepresenting their security before. More mainstream companies like those featured on this site are almost certainly encrypted properly. But if you’re comfortable with running the test yourself, it’s always good practice to ‘trust but verify.’
Further Reading


Good information, stuff I forgot years ago after I retired! Can you tell point me to a site that will detect whether my connection is encrypted and at what level (ie: AES-256…etc, etc)
Many thanks.
-joe-
There aren’t any websites that can test your VPN encryption level. You’ll need to use something like Wireshark to inspect the packets yourself.