ASUSWRT-Merlin is a custom (free) firmware built exclusively for ASUS/ASUSWRT routers. It adds a TON of functionality, especially in terms of running a VPN client or server on your router. This step-by-step tutorial will teach you how to setup an OpenVPN tunnel with ASUSWRT-Merlin.
We’ll even discuss advanced topics like customizing encryption strength, DNS leaks, and using policy rules to create a kill-switch.
If you prefer video, check out our youtube tutorial:
VPN used in this tutorial:
This tutorial was done with IPVanish VPN. We chose them for two reasons:
- It’s awesome (and super fast). And currently you can save 25% on IPVanish!
- Their config files (like many VPN providers) don’t include the CA certificate file, so there’s any extra step involved. We wanted to make sure to show how this is done. Providers like NordVPN actually combine the .ovpn and CA file into 1, making setup a bit easier. Don’t worry if you don’t understand these terms yet, we’ll cover it all in this guide.
Things you need for this tutorial:
There are a couple pre-requisites before starting this tutorial. You’ll need:
What you need:
- An ASUS Router that comes with ASUSWRT firmware. We recommend the RT-AC68U, or one of these excellent alternatives.
- Merlin firmware installed on your router. If you haven’t done this yet, it’s really easy.
- VPN Subscription. We recommend IPVanish, Private Internet Access, ExpressVPN, NordVPN, or Torguard.
- The .ovpn/config files for your VPN provider. Check the support/help docs for your VPN, or just google ‘yourvpnname + openvpn config’ and you should find what you’re looking for.
#1 – Sign into your router control panel
To create a VPN connection you need to sign into your ASUSWRT-Merlin control panel. To access it, type the IP address of your router into the URL bar of your browser. By default, it will be 192.168.1.1 (unless you previously changed it to a different IP/subnet).
Ours happens to be set to 192.168.138.1
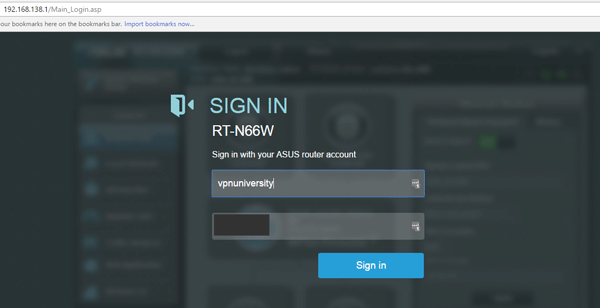
Enter your username/password. You may have set this previously when you first setup the router. Otherwise it will be the default combo of admin/admin.
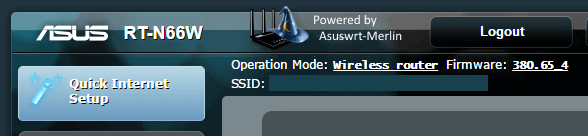
Upon logging in, you should see the ‘Powered by Merlin’ logo, confirming that you’re using the ASUSWRT-Merlin build firmware.
#2 – Open the VPN Client settings
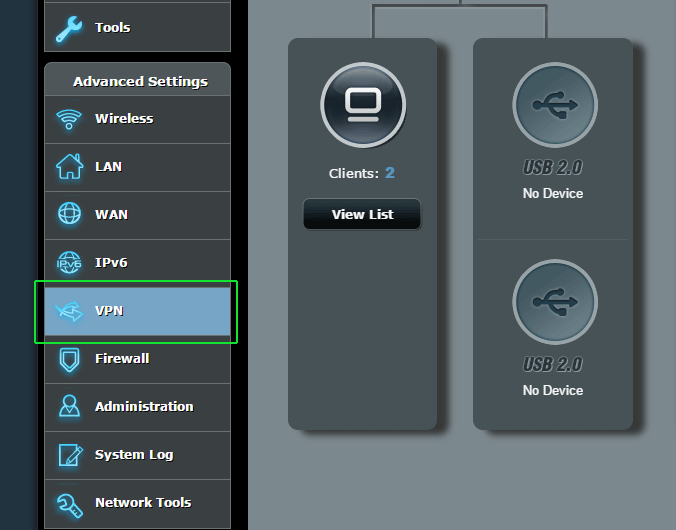
On the bottom left of the main screen, locate the ‘VPN’ section under ‘Advanced Settings’. Click that to bring up the VPN control panel.
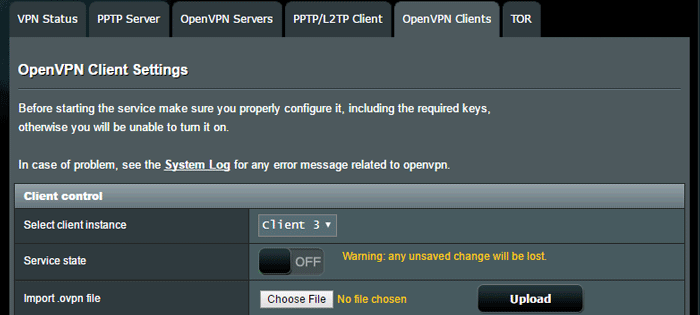
Then click the tab at the top of the main screen that says OpenVPN Clients.

You’ll see the full OpenVPN settings screen. Merlin lets you configure up to 5 VPN client setups at once, and then you can switch between them simply by toggling them on/off. You’ll probably start with ‘Client 1’ if you haven’t set up one yet. We already have 2 configured, so we’re using ‘Client 3’ for this tutorial.
Now you’re ready to start setting up the vpn connection…
#3 – Configure the VPN connection
This is the main part of the guide, and will be broken down into 3 steps:
- Import the .ovpn file
- Add the CA certificate (if necessary)
- Test the connection
- Advanced settings
Let’s get started!
Part 1: Import an .ovpn config file
The .ovpn config file is the basis of an OpenVPN connection. It’s really just a simple text file that specifies important parameters for your vpn connection, and includes things like:
- The address of the server you’re connecting to
- Port/Protocol used
- Encryption Algorithm/Mode (AES, Blowfish, etc…)
- Encryption strength (Usually 128-bit or 256-bit)
- Special parameters
The .ovpn config files are unique to each VPN provider, but should be the same for every subscriber. They don’t include any personal details like passwords or secret keys. Each server has it’s own config file, so make sure to choose the .ovpn file that corresponds to the VPN server location you want to connect to.
Since we’re using IPVanish for this tutorial, you can find their config files here.
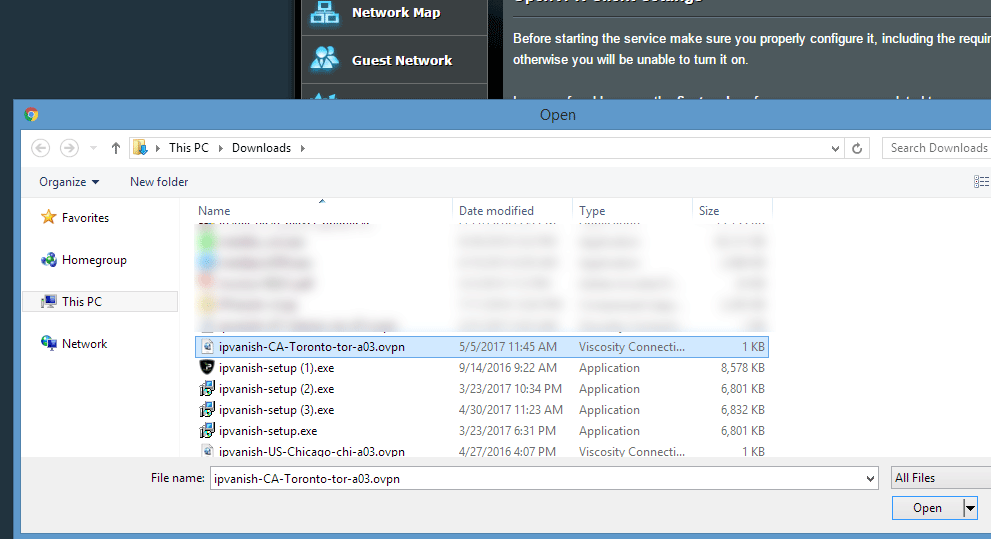
We chose to use a VPN server in Toronto, Canada. Specifically it was:
ipvanish-CA-Toronto-tor-a03.ovpn
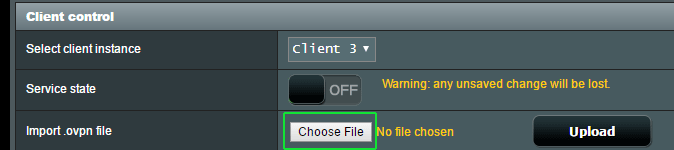
Upload the .ovpn file to the router
Under the ‘client control‘ section, look for the ‘Import .ovpn file’ line. Then click the ‘Choose File’ button.
Then navigate to folder location where you’ve saved the ovpn config files. Choose the one you want and click ‘Open.’
Then, make sure to click the Upload button to actually transfer the file to your router.

Now if your .ovpn file doesn’t have a CA certificate file (and IPVanish’s doesn’t) you’ll likely get an error message like this…

And you’ll get a ‘Failed’ message in yellow next the ‘Upload’ button. But if you look in the section below, you’ll notice that a bunch of settings have actually been imported from the .ovpn file. Now we just need to manually add the CA certificate file. If your provider embeds the CA in the .ovpn file and you didn’t get an error, just skip the next step and go to Part 3.
Part 2: Manually import the CA certificate
If your VPN provider has a separate certificate file (file extension .crt) we need to import that manually. It will usually be in the same zip file you downloaded with all the .ovpn configs.
Locate the .crt (Certificate Authority) file and open it with a text editor like notepad. You’ll see something like this…
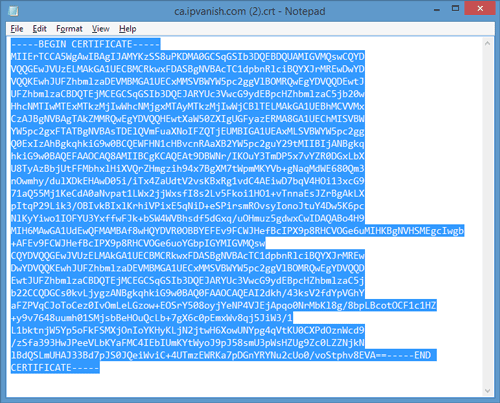
You want to copy the entire text contents of the file, starting with ‘—-BEGIN CERTIFICATE—–‘ all the way through ‘—-END CERTIFICATE—–‘
Then go back into your router control panel.
Still under the OpenVPN client settings, look for the Authorization Mode line. On the right site, click the yellow text that says: ‘Content Modification of Keys and Certificates’
In the section labelled ‘Certificate Authority’ paste the text that you copied from the .crt file.
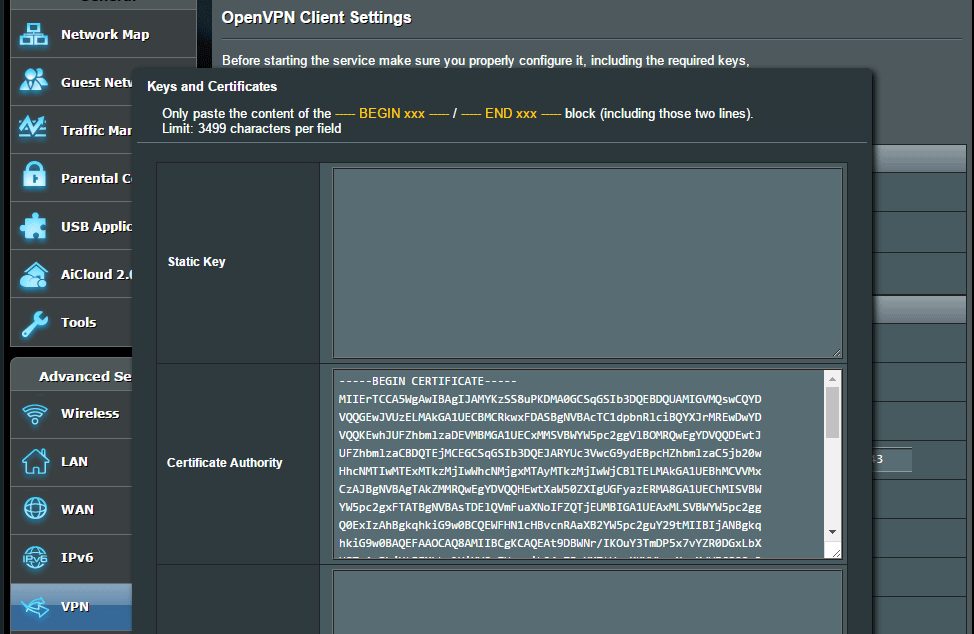
Then just click Save and you should be done with this step.
Part 3: Test the connection
Here we’ll add your username/password for the VPN. You can also tweak certain settings (such as encryption algorithm) as long as your VPN supports multiple configurations on the same server.
The first thing we want to do is enter your Username/Password in the appropriate fields and test the connection.

Now test the connection by toggling the Service State to On.

Now let your router apply the changes. If you don’t get an error message from ASUSWRT-Merlin, go to your web browser and navigate to an IP testing site like iplocation.net or IPLeak.net.
Basically as long as you have internet connectivity and your IP address is different than it was before, your VPN is setup and working. If either of things isn’t true, skip ahead to our troubleshooting step.
Assuming things are working right, lets dive deeper into the settings…
Part 4: Basic/Advanced Settings Settings
ASUSWRT Merlin gives you really fine-grained control over your VPN connection. You can choose a specific encryption strength or algorithm (assuming your VPN supports multiple). You can also choose whether your VPN will authenticate incoming data (to prevent man-in-the-middle attacks), whether to use handshake encryption, etc. So here’s a closer look at what each of these settings means.
Feel free to tweak and try different things. If your VPN connection breaks, it means your provider (or that server) doesn’t support the configuration you’re trying.
Basic Settings:
Start On Wan: If you select ‘Yes’ your VPN connection will start every time the router boots up. If you prefer to manually turn on the VPN, set it to ‘No.’
Interface (Tun or Tap). For simplicity, you should always leave this as Tun unless your VPN config file specifies tap.
Protocol (UDP or TCP): This will be set by the imported .ovpn config file. UDP usually results in faster speeds and is recommended for most VPN uses.
Server Address and Port: This will be specified in the .ovpn config file. If you’re behind a vpn-blocking firewall, choose a config with TCP (protocol) and port 443.
Firewall: Leave this on Automatic
Authorization Mode: This should be imported from the .ovpn file. It defines how the handshake (start of the VPN connection) is handled. It will almost always be TLS.
Username/Password Authentication: Make sure this is set to ‘Yes’ (assuming your VPN provider has a username/password).
Username/Password Auth Only: This setting should almost always be ‘No.’ Most VPNs will use a CA certificate for authentication of the client and server. Choosing ‘NO’ allows you to import the .crt CA file as we did earlier in this guide.
Auth Digest: This is the hash algorithm used to authenticate that your incoming data packets were actually sent from the VPN server and not an attacker. This will usually be specified and imported from the .ovpn file. It will almost always be SHA1 or SHA256, with the latter being much more secure.
Advanced Settings:
Global Log Verbosity: A number from 0-11 that specifies how much detail will be provided in the router logs related to the VPN connection. Higher = more detail. If trying to troubleshoot a connection that isn’t working properly, make this number higher.
Accept DNS Configuration: Choose whether to let the VPN server specify the DNS servers you use or whether to ignore them and pick your own. Most VPN providers have their own private DNS servers, so ‘Strict’ is a good setting. This is especially important if you’re using a VPN who’s DNS servers are required to unblock sites like Netflix. NordVPN is a good example. If you still prefer to use your own, choose ‘Disable.’ For troubleshooting see Merlin DNS Leaks.
Cipher Negotiation: This setting is unique to ASUSWRT-Merlin (not in the stock ASUSWRT). It allows the server and client (router) to work together to choose the best possible encryption cipher from a number of available options. The recommended setting is Enabled (with fallback).
Negotiable Ciphers: This list of Cipher’s that the client/server support. If none of these Ciphers work for both, then the fallback will be used.
Compression: Compression is a lossless technique to reduce the size of data before transmission. It makes your VPN connection faster and more efficient. The algorithm used will usually be specified in the .ovpn config file.
Redirect Internet Traffic (All, None, Policy rules): This setting lets you specify which connected devices will use the VPN tunnel. If you choose policy rules, you can specify certain devices (by IP or mac address) than will (or won’t) use the VPN connection. You can also specify that certain websites (based on their IP address) will bypass the VPN.
Block routed clients if tunnel goes down: This is a built-in killswitch option. If you choose yes, any client that is normally routed through the VPN will be denied internet access if the VPN tunnel goes down. It’s a useful fail-safe for security-critical VPN uses.
Test & Fix DNS Leaks
If you’re concerned about your internet provider snooping on your browsing history, or you want to access VPN-blocking services like Netflix and Hulu, you need to make sure VPN tunnel is using the correct DNS servers.
So we need to test for DNS leaks
- Go to dnsleaktest.com
- Run the extended test
- You should see DNS servers (usually just 1) that belong to your VPN provider, and no other DNS like google or your ISP.
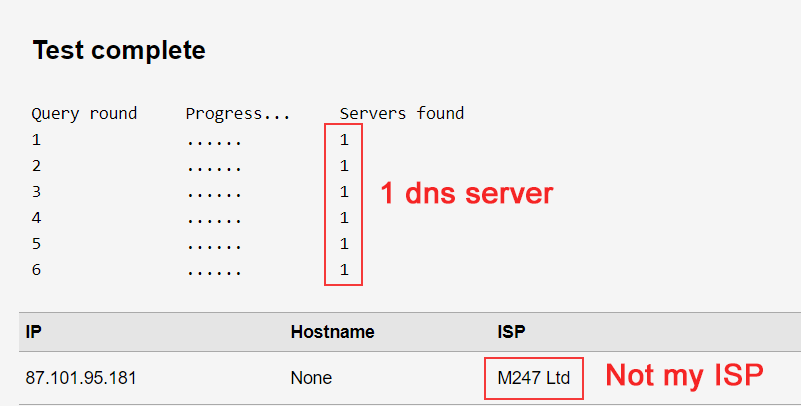
Results: If you see the wrong DNS, you are leaking DNS queries. The most common fix is the glitch mentioned below:
Important DNS Tip!
While recording our Youtube tutorial, I discovered a glitch in the way Merlin enforces DNS settings for VPN connections.
The issue: It appears that any DNS servers specified under LAN > dhcp > dns can override your VPNs dns configuration, even when set to ‘strict’ or ‘exclusive’.
The fix: Delete the DNS servers from LAN > DCHP and set your VPNs DNS configuration to ‘exclusive’.
Recommended settings for top VPNs
I realize that this stuff can be intimidating and tricky for beginners. It’s kind of like a foreign language at first. So we tested Merlin with several of the world’s most popular VPN providers, and posted configurations that we found effective and secure.
If you find these useful, please take a second and share this site your friends. We’d really appreciate it.
NordVPN ASUSWRT-Merlin Settings
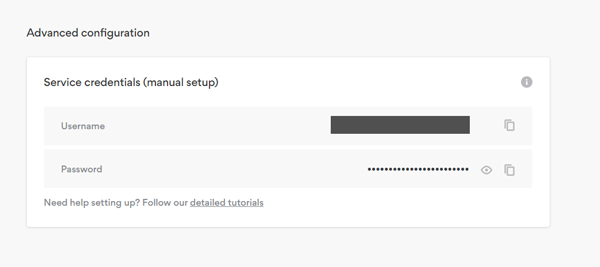
Important: Manual configurations like ASUSWRT-Merlin use a different login/password than the NordVPN software. You have to get this from your account panel.
- Get the ‘manual configuration’ credentials from your NordVPN portal
- Download a server config from the Config list
- Import the config to the router (and upload)
- Enter login/password from step 1
- Set DNS to ‘Exclusive’ for Netflix & Streaming
Private Internet Access Settings
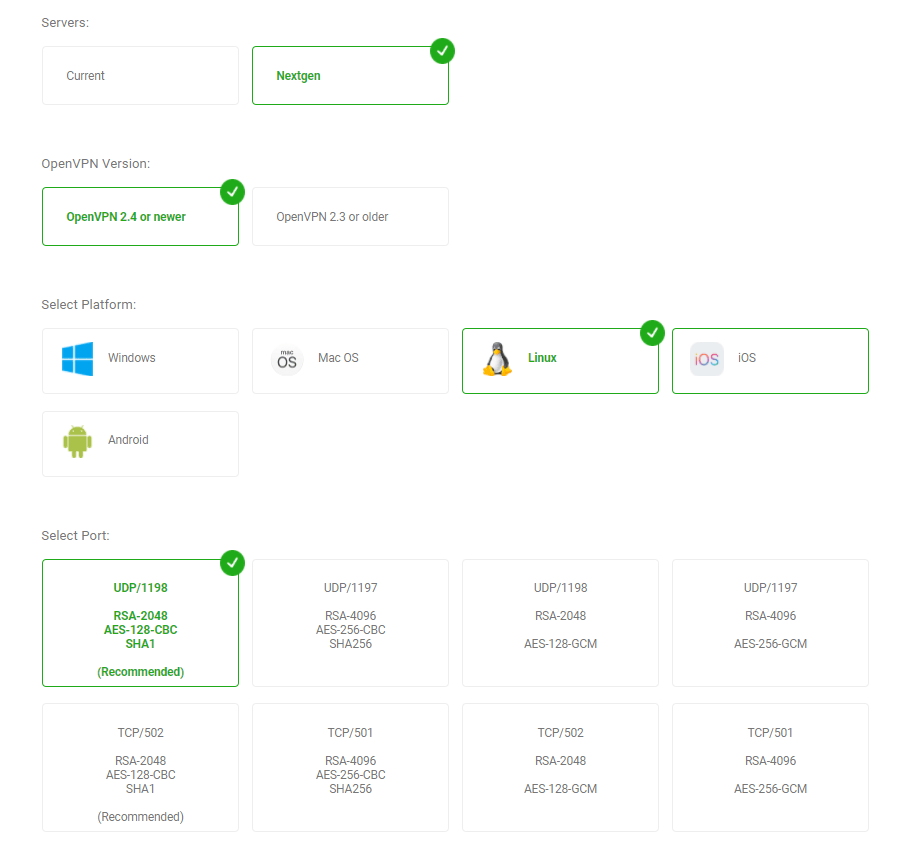
Important: Private Internet Access has release new OpenVPN configs for their Next-gen network. This enables advanced features like Netflix-support and ad-blocking on your router.
- To get the config files: go to PIA’s Config Generator (login required).
- Servers: Nextgen
- OpenVPN Version: 2.4 and newer (supported by Merlin)
- Platform: Linux (confirmed working)
- Port: UDP/1198 will be the best for most users (fast & secure)
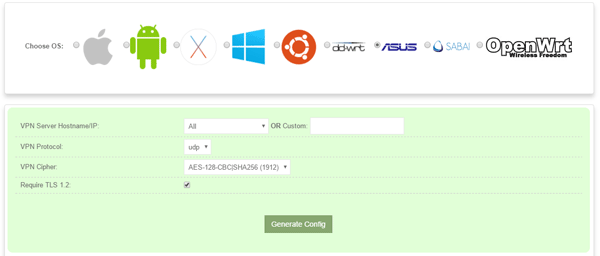
ASUSWRT-Merlin setup for Torguard VPN
Torguard now has an awesome new .ovpn config generator, then will spit out custom config files for any device, including asus routers. Simply specify your preferred encryption/authentication settings and it will generate configs for whatever server location you want. Then just upload the .ovpn file to ASUSWRT-Merlin, enter your username/password, and you’re all set.
Advanced Configuration
Setting up the VPN client is just a fraction of what the Merlin firmware is capable of. Here are some more advanced options you might be interested in:
- Set up a kill-switch and policy-based routing
- Enable the Download Master torrent client
- Get started with custom scripts
If you have any questions, tips or suggestions please let us know in the comments!


Hi great guide!
Q: There are options for 5 simultaneous VPN clients. Is it possible to have an IP address allowed on multiple VPN lines with a kill switch placed on the last route? Is there an order of precedence that can be configured for a given local host?
You can run multiple VPNs simultaneously on Merlin and connect different devices to each, but they aren’t routed sequentially if that’s what you mean.
In other words: The VPN connections aren’t layered, they run side-by-side in parallel (as I understand it).
Great write-up, thank you. As you know, many VPNs have different servers for different uses, like torrenting and streaming from Netflix. I added multiple clients for my VPN (VPN Unlimited) for different use cases, and it seems they can all be active concurrently. How do I specify which client to use for torrenting or streaming, versus general use, which I assume would just get the client closest geographically? Would it be a setting in the software, or is it port routing in the router? Is it just handled automatically?
If you’re doing all these activities from a single device, then you’d have to manually switch the active VPN connection on your router. If you do streaming on one device and torrenting on another, you can have multiple active VPN connections using Merlin and then use the ‘policy routing’ rules to tell the router which device to route to which connection.
Thank you for this guide.
I have a setup with at Netgear Router R8000 acting as VPN-server (OpenVPN), and an Asus RT-AC66U router as a VPN client. The Asus router is placed behind a Huawei ISP router (NAT). Dual router setup works fine with access to internet after following your other guide https://www.vpnuniversity.com/routers/setup-two-routers-with-dedicated-vpn-router
I have generated a .ovpn file from the Netgear router (VPN server) and followed your guide on this webpage. Sadly the VPN-client connection won’t work, and my knowlegde in this field is limited. The Asus router (VPN client) log reports an error “WARNING: No server certificate verification method has been enabled. See http://openvpn.net/howto.html#mitm for more info.”
Could you help me locate and resolve the problem?
A full report of the asus router (VPN-client) log is shown below.
Nov 11 12:55:39 rc_service: httpd 292:notify_rc start_vpnclient1
Nov 11 12:55:40 openvpn[5988]: Current Parameter Settings:
Nov 11 12:55:40 openvpn[5988]: config = ‘config.ovpn’
Nov 11 12:55:40 openvpn[5988]: mode = 0
Nov 11 12:55:40 openvpn[5988]: persist_config = DISABLED
Nov 11 12:55:40 openvpn[5988]: persist_mode = 1
Nov 11 12:55:40 openvpn[5988]: show_ciphers = DISABLED
Nov 11 12:55:40 openvpn[5988]: show_digests = DISABLED
Nov 11 12:55:40 openvpn[5988]: show_engines = DISABLED
Nov 11 12:55:40 openvpn[5988]: genkey = DISABLED
Nov 11 12:55:40 openvpn[5988]: key_pass_file = ‘[UNDEF]’
Nov 11 12:55:40 openvpn[5988]: show_tls_ciphers = DISABLED
Nov 11 12:55:40 openvpn[5988]: connect_retry_max = 0
Nov 11 12:55:40 openvpn[5988]: Connection profiles [0]:
Nov 11 12:55:40 openvpn[5988]: proto = udp
Nov 11 12:55:40 openvpn[5988]: local = ‘[UNDEF]’
Nov 11 12:55:40 openvpn[5988]: local_port = ‘[UNDEF]’
Nov 11 12:55:40 openvpn[5988]: remote = ‘xxxxx.mynetgear.com’
Nov 11 12:55:40 openvpn[5988]: remote_port = ‘12974’
Nov 11 12:55:40 openvpn[5988]: remote_float = DISABLED
Nov 11 12:55:40 openvpn[5988]: bind_defined = DISABLED
Nov 11 12:55:40 openvpn[5988]: bind_local = DISABLED
Nov 11 12:55:40 openvpn[5988]: bind_ipv6_only = DISABLED
Nov 11 12:55:40 openvpn[5988]: connect_retry_seconds = 5
Nov 11 12:55:40 openvpn[5988]: connect_timeout = 120
Nov 11 12:55:40 openvpn[5988]: socks_proxy_server = ‘[UNDEF]’
Nov 11 12:55:40 openvpn[5988]: socks_proxy_port = ‘[UNDEF]’
Nov 11 12:55:40 openvpn[5988]: tun_mtu = 1500
Nov 11 12:55:40 openvpn[5988]: tun_mtu_defined = ENABLED
Nov 11 12:55:40 openvpn[5988]: link_mtu = 1500
Nov 11 12:55:40 openvpn[5988]: link_mtu_defined = DISABLED
Nov 11 12:55:40 openvpn[5988]: tun_mtu_extra = 32
Nov 11 12:55:40 openvpn[5988]: tun_mtu_extra_defined = ENABLED
Nov 11 12:55:40 openvpn[5988]: mtu_discover_type = -1
Nov 11 12:55:40 openvpn[5988]: fragment = 0
Nov 11 12:55:40 openvpn[5988]: mssfix = 1450
Nov 11 12:55:40 openvpn[5988]: explicit_exit_notification = 0
Nov 11 12:55:40 openvpn[5988]: Connection profiles END
Nov 11 12:55:40 openvpn[5988]: remote_random = DISABLED
Nov 11 12:55:40 openvpn[5988]: ipchange = ‘[UNDEF]’
Nov 11 12:55:40 openvpn[5988]: dev = ‘tap11’
Nov 11 12:55:40 openvpn[5988]: dev_type = ‘[UNDEF]’
Nov 11 12:55:40 openvpn[5988]: dev_node = ‘NETGEAR-VPN’
Nov 11 12:55:40 openvpn[5988]: lladdr = ‘[UNDEF]’
Nov 11 12:55:40 openvpn[5988]: topology = 1
Nov 11 12:55:40 openvpn[5988]: ifconfig_local = ‘[UNDEF]’
Nov 11 12:55:40 openvpn[5988]: ifconfig_remote_netmask = ‘[UNDEF]’
Nov 11 12:55:40 openvpn[5988]: ifconfig_noexec = DISABLED
Nov 11 12:55:40 openvpn[5988]: ifconfig_nowarn = DISABLED
Nov 11 12:55:40 openvpn[5988]: ifconfig_ipv6_local = ‘[UNDEF]’
Nov 11 12:55:40 openvpn[5988]: ifconfig_ipv6_netbits = 0
Nov 11 12:55:40 openvpn[5988]: ifconfig_ipv6_remote = ‘[UNDEF]’
Nov 11 12:55:40 openvpn[5988]: shaper = 0
Nov 11 12:55:40 openvpn[5988]: mtu_test = 0
Nov 11 12:55:40 openvpn[5988]: mlock = DISABLED
Nov 11 12:55:40 openvpn[5988]: keepalive_ping = 0
Nov 11 12:55:40 openvpn[5988]: keepalive_timeout = 0
Nov 11 12:55:40 openvpn[5988]: inactivity_timeout = 0
Nov 11 12:55:40 openvpn[5988]: ping_send_timeout = 0
Nov 11 12:55:40 openvpn[5988]: ping_rec_timeout = 0
Nov 11 12:55:40 openvpn[5988]: ping_rec_timeout_action = 0
Nov 11 12:55:40 openvpn[5988]: ping_timer_remote = DISABLED
Nov 11 12:55:40 openvpn[5988]: remap_sigusr1 = 0
Nov 11 12:55:40 openvpn[5988]: persist_tun = ENABLED
Nov 11 12:55:40 openvpn[5988]: persist_local_ip = DISABLED
Nov 11 12:55:40 openvpn[5988]: persist_remote_ip = DISABLED
Nov 11 12:55:40 openvpn[5988]: persist_key = ENABLED
Nov 11 12:55:40 openvpn[5988]: passtos = DISABLED
Nov 11 12:55:40 openvpn[5988]: resolve_retry_seconds = 1000000000
Nov 11 12:55:40 openvpn[5988]: resolve_in_advance = DISABLED
Nov 11 12:55:40 openvpn[5988]: username = ‘[UNDEF]’
Nov 11 12:55:40 openvpn[5988]: groupname = ‘[UNDEF]’
Nov 11 12:55:40 openvpn[5988]: chroot_dir = ‘[UNDEF]’
Nov 11 12:55:40 openvpn[5988]: cd_dir = ‘/etc/openvpn/client1’
Nov 11 12:55:40 openvpn[5988]: writepid = ‘[UNDEF]’
Nov 11 12:55:40 openvpn[5988]: up_script = ‘[UNDEF]’
Nov 11 12:55:40 openvpn[5988]: down_script = ‘[UNDEF]’
Nov 11 12:55:40 openvpn[5988]: down_pre = DISABLED
Nov 11 12:55:40 openvpn[5988]: up_restart = DISABLED
Nov 11 12:55:40 openvpn[5988]: up_delay = DISABLED
Nov 11 12:55:40 openvpn[5988]: daemon = ENABLED
Nov 11 12:55:40 openvpn[5988]: inetd = 0
Nov 11 12:55:40 openvpn[5988]: log = DISABLED
Nov 11 12:55:40 openvpn[5988]: suppress_timestamps = DISABLED
Nov 11 12:55:40 openvpn[5988]: machine_readable_output = DISABLED
Nov 11 12:55:40 openvpn[5988]: nice = 0
Nov 11 12:55:40 openvpn[5988]: verbosity = 5
Nov 11 12:55:40 openvpn[5988]: mute = 0
Nov 11 12:55:40 openvpn[5988]: status_file = ‘status’
Nov 11 12:55:40 openvpn[5988]: status_file_version = 2
Nov 11 12:55:40 openvpn[5988]: status_file_update_freq = 5
Nov 11 12:55:40 openvpn[5988]: occ = ENABLED
Nov 11 12:55:40 openvpn[5988]: rcvbuf = 0
Nov 11 12:55:40 openvpn[5988]: sndbuf = 0
Nov 11 12:55:40 openvpn[5988]: sockflags = 0
Nov 11 12:55:40 openvpn[5988]: fast_io = DISABLED
Nov 11 12:55:40 openvpn[5988]: comp.alg = 2
Nov 11 12:55:40 openvpn[5988]: comp.flags = 1
Nov 11 12:55:40 openvpn[5988]: route_script = ‘vpnrouting.sh’
Nov 11 12:55:40 openvpn[5988]: route_default_gateway = ‘[UNDEF]’
Nov 11 12:55:40 openvpn[5988]: route_default_metric = 0
Nov 11 12:55:40 openvpn[5988]: route_noexec = DISABLED
Nov 11 12:55:40 openvpn[5988]: route_delay = 2
Nov 11 12:55:40 openvpn[5988]: route_delay_window = 30
Nov 11 12:55:40 openvpn[5988]: route_delay_defined = ENABLED
Nov 11 12:55:40 openvpn[5988]: route_nopull = DISABLED
Nov 11 12:55:40 openvpn[5988]: route_gateway_via_dhcp = DISABLED
Nov 11 12:55:40 openvpn[5988]: allow_pull_fqdn = DISABLED
Nov 11 12:55:40 openvpn[5988]: management_addr = ‘[UNDEF]’
Nov 11 12:55:40 openvpn[5988]: management_port = ‘[UNDEF]’
Nov 11 12:55:40 openvpn[5988]: management_user_pass = ‘[UNDEF]’
Nov 11 12:55:40 openvpn[5988]: management_log_history_cache = 250
Nov 11 12:55:40 openvpn[5988]: management_echo_buffer_size = 100
Nov 11 12:55:40 openvpn[5988]: management_write_peer_info_file = ‘[UNDEF]’
Nov 11 12:55:40 openvpn[5988]: management_client_user = ‘[UNDEF]’
Nov 11 12:55:40 openvpn[5988]: management_client_group = ‘[UNDEF]’
Nov 11 12:55:40 openvpn[5988]: management_flags = 0
Nov 11 12:55:40 openvpn[5988]: shared_secret_file = ‘[UNDEF]’
Nov 11 12:55:40 openvpn[5988]: key_direction = 0
Nov 11 12:55:40 openvpn[5988]: ciphername = ‘AES-128-CBC’
Nov 11 12:55:40 openvpn[5988]: ncp_enabled = ENABLED
Nov 11 12:55:40 openvpn[5988]: ncp_ciphers = ‘AES-128-GCM:AES-256-GCM:AES-128-CBC:AES-256-CBC’
Nov 11 12:55:40 openvpn[5988]: authname = ‘SHA1’
Nov 11 12:55:40 openvpn[5988]: prng_hash = ‘SHA1’
Nov 11 12:55:40 openvpn[5988]: prng_nonce_secret_len = 16
Nov 11 12:55:40 openvpn[5988]: keysize = 0
Nov 11 12:55:40 openvpn[5988]: engine = DISABLED
Nov 11 12:55:40 openvpn[5988]: replay = ENABLED
Nov 11 12:55:40 openvpn[5988]: mute_replay_warnings = DISABLED
Nov 11 12:55:40 openvpn[5988]: replay_window = 64
Nov 11 12:55:40 openvpn[5988]: replay_time = 15
Nov 11 12:55:40 openvpn[5988]: packet_id_file = ‘[UNDEF]’
Nov 11 12:55:40 openvpn[5988]: use_iv = ENABLED
Nov 11 12:55:40 openvpn[5988]: test_crypto = DISABLED
Nov 11 12:55:40 openvpn[5988]: tls_server = DISABLED
Nov 11 12:55:40 openvpn[5988]: tls_client = ENABLED
Nov 11 12:55:40 openvpn[5988]: key_method = 2
Nov 11 12:55:40 openvpn[5988]: ca_file = ‘ca.crt’
Nov 11 12:55:40 openvpn[5988]: ca_path = ‘[UNDEF]’
Nov 11 12:55:40 openvpn[5988]: dh_file = ‘[UNDEF]’
Nov 11 12:55:40 openvpn[5988]: cert_file = ‘client.crt’
Nov 11 12:55:40 openvpn[5988]: extra_certs_file = ‘[UNDEF]’
Nov 11 12:55:40 openvpn[5988]: priv_key_file = ‘client.key’
Nov 11 12:55:40 openvpn[5988]: pkcs12_file = ‘[UNDEF]’
Nov 11 12:55:40 openvpn[5988]: cipher_list = ‘[UNDEF]’
Nov 11 12:55:40 openvpn[5988]: tls_verify = ‘[UNDEF]’
Nov 11 12:55:40 openvpn[5988]: tls_export_cert = ‘[UNDEF]’
Nov 11 12:55:40 openvpn[5988]: verify_x509_type = 0
Nov 11 12:55:40 openvpn[5988]: verify_x509_name = ‘[UNDEF]’
Nov 11 12:55:40 openvpn[5988]: crl_file = ‘[UNDEF]’
Nov 11 12:55:40 openvpn[5988]: ns_cert_type = 0
Nov 11 12:55:40 openvpn[5988]: remote_cert_ku[i] = 0
Nov 11 12:55:40 openvpn[5988]: remote_cert_ku[i] = 0
Nov 11 12:55:40 openvpn[5988]: remote_cert_ku[i] = 0
Nov 11 12:55:40 openvpn[5988]: remote_cert_ku[i] = 0
Nov 11 12:55:40 openvpn[5988]: remote_cert_ku[i] = 0
Nov 11 12:55:40 openvpn[5988]: remote_cert_ku[i] = 0
Nov 11 12:55:40 openvpn[5988]: remote_cert_ku[i] = 0
Nov 11 12:55:40 openvpn[5988]: remote_cert_ku[i] = 0
Nov 11 12:55:40 openvpn[5988]: remote_cert_ku[i] = 0
Nov 11 12:55:40 openvpn[5988]: remote_cert_ku[i] = 0
Nov 11 12:55:40 openvpn[5988]: remote_cert_ku[i] = 0
Nov 11 12:55:40 openvpn[5988]: remote_cert_ku[i] = 0
Nov 11 12:55:40 openvpn[5988]: remote_cert_ku[i] = 0
Nov 11 12:55:40 openvpn[5988]: remote_cert_ku[i] = 0
Nov 11 12:55:40 openvpn[5988]: remote_cert_ku[i] = 0
Nov 11 12:55:40 openvpn[5988]: remote_cert_ku[i] = 0
Nov 11 12:55:40 openvpn[5988]: remote_cert_eku = ‘[UNDEF]’
Nov 11 12:55:40 openvpn[5988]: ssl_flags = 0
Nov 11 12:55:40 openvpn[5988]: tls_timeout = 2
Nov 11 12:55:40 openvpn[5988]: renegotiate_bytes = -1
Nov 11 12:55:40 openvpn[5988]: renegotiate_packets = 0
Nov 11 12:55:40 openvpn[5988]: renegotiate_seconds = 3600
Nov 11 12:55:40 openvpn[5988]: handshake_window = 60
Nov 11 12:55:40 openvpn[5988]: transition_window = 3600
Nov 11 12:55:40 openvpn[5988]: single_session = DISABLED
Nov 11 12:55:40 openvpn[5988]: push_peer_info = DISABLED
Nov 11 12:55:40 openvpn[5988]: tls_exit = DISABLED
Nov 11 12:55:40 openvpn[5988]: tls_auth_file = ‘[UNDEF]’
Nov 11 12:55:40 openvpn[5988]: tls_crypt_file = ‘[UNDEF]’
Nov 11 12:55:40 openvpn[5988]: server_network = 0.0.0.0
Nov 11 12:55:40 openvpn[5988]: server_netmask = 0.0.0.0
Nov 11 12:55:40 openvpn[5988]: server_network_ipv6 = ::
Nov 11 12:55:40 openvpn[5988]: server_netbits_ipv6 = 0
Nov 11 12:55:40 openvpn[5988]: server_bridge_ip = 0.0.0.0
Nov 11 12:55:40 openvpn[5988]: server_bridge_netmask = 0.0.0.0
Nov 11 12:55:40 openvpn[5988]: server_bridge_pool_start = 0.0.0.0
Nov 11 12:55:40 openvpn[5988]: server_bridge_pool_end = 0.0.0.0
Nov 11 12:55:40 openvpn[5988]: ifconfig_pool_defined = DISABLED
Nov 11 12:55:40 openvpn[5988]: ifconfig_pool_start = 0.0.0.0
Nov 11 12:55:40 openvpn[5988]: ifconfig_pool_end = 0.0.0.0
Nov 11 12:55:40 openvpn[5988]: ifconfig_pool_netmask = 0.0.0.0
Nov 11 12:55:40 openvpn[5988]: ifconfig_pool_persist_filename = ‘[UNDEF]’
Nov 11 12:55:40 openvpn[5988]: ifconfig_pool_persist_refresh_freq = 600
Nov 11 12:55:40 openvpn[5988]: ifconfig_ipv6_pool_defined = DISABLED
Nov 11 12:55:40 openvpn[5988]: ifconfig_ipv6_pool_base = ::
Nov 11 12:55:40 openvpn[5988]: ifconfig_ipv6_pool_netbits = 0
Nov 11 12:55:40 openvpn[5988]: n_bcast_buf = 256
Nov 11 12:55:40 openvpn[5988]: tcp_queue_limit = 64
Nov 11 12:55:40 openvpn[5988]: real_hash_size = 256
Nov 11 12:55:40 openvpn[5988]: virtual_hash_size = 256
Nov 11 12:55:40 openvpn[5988]: client_connect_script = ‘[UNDEF]’
Nov 11 12:55:40 openvpn[5988]: learn_address_script = ‘[UNDEF]’
Nov 11 12:55:40 openvpn[5988]: client_disconnect_script = ‘[UNDEF]’
Nov 11 12:55:40 openvpn[5988]: client_config_dir = ‘[UNDEF]’
Nov 11 12:55:40 openvpn[5988]: ccd_exclusive = DISABLED
Nov 11 12:55:40 openvpn[5988]: tmp_dir = ‘/tmp’
Nov 11 12:55:40 openvpn[5988]: push_ifconfig_defined = DISABLED
Nov 11 12:55:40 openvpn[5988]: push_ifconfig_local = 0.0.0.0
Nov 11 12:55:40 openvpn[5988]: push_ifconfig_remote_netmask = 0.0.0.0
Nov 11 12:55:40 openvpn[5988]: push_ifconfig_ipv6_defined = DISABLED
Nov 11 12:55:40 openvpn[5988]: push_ifconfig_ipv6_local = ::/0
Nov 11 12:55:40 openvpn[5988]: push_ifconfig_ipv6_remote = ::
Nov 11 12:55:40 openvpn[5988]: enable_c2c = DISABLED
Nov 11 12:55:40 openvpn[5988]: duplicate_cn = DISABLED
Nov 11 12:55:40 openvpn[5988]: cf_max = 0
Nov 11 12:55:40 openvpn[5988]: cf_per = 0
Nov 11 12:55:40 openvpn[5988]: max_clients = 1024
Nov 11 12:55:40 openvpn[5988]: max_routes_per_client = 256
Nov 11 12:55:40 openvpn[5988]: auth_user_pass_verify_script = ‘[UNDEF]’
Nov 11 12:55:40 openvpn[5988]: auth_user_pass_verify_script_via_file = DISABLED
Nov 11 12:55:40 openvpn[5988]: auth_token_generate = DISABLED
Nov 11 12:55:40 openvpn[5988]: auth_token_lifetime = 0
Nov 11 12:55:40 openvpn[5988]: port_share_host = ‘[UNDEF]’
Nov 11 12:55:40 openvpn[5988]: port_share_port = ‘[UNDEF]’
Nov 11 12:55:40 openvpn[5988]: client = ENABLED
Nov 11 12:55:40 openvpn[5988]: pull = ENABLED
Nov 11 12:55:40 openvpn[5988]: auth_user_pass_file = ‘[UNDEF]’
Nov 11 12:55:40 openvpn[5988]: OpenVPN 2.4.3 mipsel-unknown-linux-gnu [SSL (OpenSSL)] [LZO] [LZ4] [EPOLL] [MH/PKTINFO] [AEAD] built on Apr 8 2018
Nov 11 12:55:40 openvpn[5988]: library versions: OpenSSL 1.0.2n 7 Dec 2017, LZO 2.08
Nov 11 12:55:40 openvpn[5990]: WARNING: No server certificate verification method has been enabled. See http://openvpn.net/howto.html#mitm for more info.
Nov 11 12:55:40 openvpn[5990]: NOTE: the current –script-security setting may allow this configuration to call user-defined scripts
Nov 11 12:55:40 openvpn[5990]: OpenSSL: error:0906D066:PEM routines:PEM_read_bio:bad end line
Nov 11 12:55:40 openvpn[5990]: OpenSSL: error:140AD009:SSL routines:SSL_CTX_use_certificate_file:PEM lib
Nov 11 12:55:40 openvpn[5990]: Cannot load certificate file client.crt
Nov 11 12:55:40 openvpn[5990]: Exiting due to fatal error
It sounds like you’re trying to create a VPN connection between your two routers. Even if you get it to work, it will only encrypt the traffic between the two routers (which are both on the same network, so you don’t get any security benefit). If the goal is to encrypt your home traffic in a way that protects you from ISP snooping or changes your IP address, you will need to connect to a remote VPN server, using VPN client mode, not server mode.
To do this you would either have to sign up for a paid/free VPN service that supports OpenVPN.
I had Google DNS servers set up. I noticed that my other (primary) router did not have any DNS servers set up on the router so I deleted the DNS values from the VPN router, but I can’t apply the changes. I keep getting a message that reads, “Please set up the DNS server on the client device.” and the router settings don’t update. AFAIK, I shouldn’t have to identify DNS servers on the router. I can do that on the adapter settings in Windows and, if I use the PC client for the VPN, my connection uses the VPN servers. Thoughts? I’m using the latest version of Merlin for my AC66U B1 router (same firmware as the AC68U).
D’oh! Never mind. The blank DNS fields on my main router were under DHCP. The fields under WAN did have IPs. Sorry, that’s what I get for doing network configurations without sleep. Thanks.
When you’re using a VPN on the router, I believe you need to have DNS set on the router. I’ve also had the issue you’re describing and that was the fix. You can use the DNS servers from your VPN if you don’t want to use GoogleDNS.
Oh, and thank you very much for your tutorials. They’re very clear and helpful. You rock.
Hi, thank you very much for the detailed explanation. However I noticed that after applying those settings; when I switch on my router, it will first let me access the internet without VPN, despite having “Block routed clients if tunnel goes down” enabled. After few seconds the VPN will connect but there is a short time frame during which I am connected to the internet without having VPN enabled. Anything I can do against that?
thank you
I think that’s a known glitch in how the VPN implementation works. Basically it still allows access while the VPN is ‘connecting’. I’m not sure there’s an easy fix.
Hi- I have an ASUS RT-AC68U router running the stock ASUS firmware (v 3.0.0.4.384_21045). I have managed to install OpenVPN in the router using config files and CA certificates, etc. from PIA (Private Internet Access) , and it works GREAT.
But, one of my ROKU apps (Amazon Prime Video) does not allow use of the PIA VPN.
This means that I must login to the router and turn off the VPN each time I want to access Amazon Prime Video, then turn it back on when I am finished with APV.
So, I would like to try split tunneling in my OpenVPN configuration so that Amazon Prime Video can tunnel through without the VPN encryption. I have seen some approaches using “route -nopull”, but they seemed to require that you know ALL of your possible ip addresses. Is there a way to have ONLY the Amazon Prime Video ip address (which I can’t seem to find, by the way) excepted from the VPN? Thanks a lot, great website!
Follow the steps in our Merlin Policy Routing guide. All you need to do is route all traffic inside the VPN, then get the IP address of your Roku and route it to WAN.
Now, it sounds like you might want the everything on your Roku to go through VPN and Prime Video to ignore the VPN. I don’t think this is possible. Services like Amazon Video and Netflix use too many IP addresses and they change too frequently. You could try a smart DNS service like unoTelly and see if that works. Several of them have no-payment trial periods. Otherwise, I think your only option would be to use prime on a separate streaming device like a FireStick.
Great article. Made it easy to set up. One question on routing through the tunnel. I would like most traffic to no go through the tunnel and only specific clients (will use MAC address) to go through the VPN. How can I set the rules to allow this ? I am running Merlin on an RT-AC3200. Thanks
Hi Jay,
You can do this with policy rules. We have a tutorial and video on this:
I have a problem with a switch attached to an ASUS RT-AX3000. The setup is a router cascade with the ASUS as secondary and a Verizon FIOS G 1100 as primary (ASUS WAN port to FIOS LAN port with a static route between). The Netgear GS108Ev3 is connected to a LAN port on the ASUS. Both routers manage their own net – 192.168.1.0 Verizon and 192.168.50.0 for ASUS.
Rationale on the setup. I want to run vpn client on ASUS (Verizon not capable) and have vpn on 192.168.50.0 net for all devices and none on 192.168.1.0. Verizon has to be gateway to internet.
Problem is that is that when a device on a wired port or logged in port on Wi-Fi to ASUS there is no issue for torrenting, but any device on the switch can not make the outside torrent connection. I’m not sure whether the issue is the router setup or something with the switch.
I haven’t tried this setup, but it should work. Why the extra switch attached to the Asus though? Why not connect directly to the asus router by LAN or wifi?
Hi,
thanks for guide.
I have VPN Unlimited and downloaded OpenVPN file. When I open it , there is section with certificate however after I upload file into Asus router, apply and try to start VPN I get error that there is no CA file.
I tried to copy it out of the file, pasted to the section in the setup, saved, but when I turn on VPN it gives me the same error and certificate I pasted is not there anymore.
Tried Apply settings but those are removing certificate section as well. not sure why.
Thanks
First, I would say to double-check that you’re pasting the correct file, and into the correct location on the ASUS Firmware. And make sure you’re saving the changes so they aren’t lost. If you’re doing all that and the CA is still disappearing, you can try pasting it into the .ovpn file like other providers do. For formatting you could download Private Internet Access’s config files to see how they embed the certificate. It should work the same.
How do I create a site to site VPN between two RT-AC68U’s ?
I want to run several webserver VMs and a VPN between two sites (web services on primary site and backup/failover site). VPN will be for replication between primary and backup site).
How does RT-AC68U is being referred to as a home router. I am finding that its performance is as good as “business” VPN routers like zyxel USG40 for example.
I haven’t experimented much with the server capabilities, but this might help you get started: https://www.snbforums.com/threads/connecting-two-asus-routers-point-to-point-via-openvpn-tun-and-server-cant-ping-client.54824/