Do you want to access more shows, content libraries and streaming apps? A VPN is one tool that can help you do that. But how can you set up a VPN for your television?
It’s not as straightforward as you’d hope (only a few Smart TV models can run VPNs apps directly).
But it’s still 100% possible to connect your TV through a VPN tunnel, using any of several workarounds. I’ll also show you another tool that might work even better than a VPN (and can be configured directly on many popular TV brands).
Why use a VPN with your TV?
If you’re happy with your current content library or cable service, there’s no need to run a VPN. But for those of you looking to unlock global content (or stream from some dodgy sources) you’ll probably need a vpn.
Benefits of streaming with a VPN:
- Access Apps from other countries: Services like Hotstar aren’t available in the US, but you can stream with an Indian IP address.
- Change content regions: Global streaming apps like Netflix actually have a different catalog in every country. By switching your virtual location (with a VPN) you can access different content with your existing subscription.
- Private streaming: Do you stream from dubious sources like Terarium, Flixter, or unlicensed Kodi Addons? You may want to protect your privacy and identity by hiding your real IP address.
Available Setup Methods
There are several methods you can use to connect your TV to a VPN. They are ranked from easiest-to-hardest.
Which to choose? It really depends on the OS (Operating System) of your TV model, whether you use streaming devices that support VPNs (FireStick), and your budget.
- Install the VPN directly on your TV – This the easiest (and best) option if it’s available. It’s only possible if your TV runs FireOS (select Toshiba and Insignia models) or Android (Sony, Sharp, Phillips).
- Install the VPN on compatible streaming device – If your TV doesn’t support VPN apps, the next-best option is to use a dedicated streaming device that does natively support VPN. Popular choices include: FireTV, Chromecast GoogleTV (latest model), NVidia ShieldTV, and pretty much any generic Android TV box.
- VPN-Enabled router – If options 1&2 don’t work, you can connect your SmartTV (or non-VPN streaming devices) to a VPN-enabled wifi network. This only works on compatible routers.
- Share the VPN via wifi – Windows 10 has easy connection sharing, via ad-hoc networks. You can share your VPN wirelessly to any device in range, with much better speeds than the router option.
- SmartDNS – The final option is: don’t use a VPN at all. Use SmartDNS. It works to unblock the most popular streaming services, doesn’t slow your download speeds and is cheaper than a VPN (or included free with NordVPN or ExpressVPN).
Which VPN To Use?
There are several good VPNs for streaming. If you’ve already got one you like, stick with that provider. If you haven’t picked one yet, here are the services I consider superior for content streaming and unblocking:
- NordVPN – Fast speeds, multiple Netflix regions, and SmartDNS included as a backup option. Plans start under $4/month. Works with more than 30 streaming services.
- ExpressVPN – It’s expensive ($13/month), but servers are fast, support is helpful and it is compatible with more than 20 streaming services. There’s even a custom app for compatible router models. It also includes SmartDNS service. Try it risk-free for 30 days.
- Hide.me – They’re an under-the-radar service with excellent streaming support. There’s even a completely free plan for up to 10GB/month (no payment method required).
- Cyberghost – This service has integrated streaming technology to unblock all the most popular services. There are even streaming-optimized servers. Plans start around $3.49/month.
#1 – Install a VPN directly on your TV
This method only works for TVs running Android OS (Android TV) or FireOS which is a custom skin of Android, made by Amazon.
How to know if your TV is compatible? Can you access the FireTV app store or Google Play store on your TV? If so, you should be able to install supported VPN apps.
Compatible TV Models
Several major television manufacturers have adopted Android TV as their OS. Most of them will be compatible with VPN apps from the Google app store. Sony is the best of the bunch, and is fully committed to the Android ecosystem. They also make damn good TVs.
- Sony (best choice): All SmartTVs manufactured from 2017-
- Phillips: Select SmartTV models
- Hisense: several AndroidTV models, including this one.
FireTV Television Models
There are also a handful of FireOS TVs, built in partnership with Amazon. These models will work with any VPN app in the Fire app store. It may also be possible to Sideload other Android VPN apps.
Top Picks:
How to set it up
Getting your VPN up and running is easy if your TV runs Android (or FireOS). Simply go to the app store and install your preferred VPN software. Obviously you’ll want to choose one that supports the streaming services you’re looking to access.
Pretty much every major VPN is in the Google Play store, and many of those have a FireTV app as well.
Just install, enter your login credentials, and click connect!
#2 – Install the VPN on a streaming device
This method has all the benefits of installing directly on your TV, it just requires one extra device (and hdmi port). Any device that runs Android or FireOS will work (except 1st-gen Firesticks).
Supported Devices:
- Firestick/FireTV (except 1st-gen)
- Chromecast Google TV (not Regular chromecast or Chromecast Ultra)
- NVidia ShieldTV
- Any streaming box running Android
Not Supported:
- Roku
- AppleTV
- Older Chromecasts (any without remote control)
How to set it up
Just download and install the VPN application from the app store (Google Play or FireTV app store depending on your device).
You’ll need to setup your login credentials one time (I recommend auto-saving them for re-use). Then connect to a server. If your service has streaming-optimized servers, choose one of those.
#3 – Use a VPN Router
Did you know that many higher-end wifi routers can actually connect directly to a VPN, and protect your entire network of devices? Most $100+ routers from Linksys, TP-Link and Buffalo are VPN-capable if you’re willing to flash the 3rd-party DDWRT router firmware.
But my personal preference is to use ASUS’s line of ASUSWRT routers, which are vpn-ready right out of the box. Plus, you can easily take them to the next level with the excellent ASUSWRT Merlin firmware (1-click install).
Pros:
- Route multiple devices through the VPN
- Works with any wifi-connected device
- Always-on connection
Cons:
- Speeds max around 25-50mbps
How to set it up
1. Choose a VPN-capable router
You’ll need a wireless router that either is VPN-ready out of the box (ASUSWRT), or is compatible with 3rd-party firmware like FreshTomato or DD-WRT.
Recommended Router: The ASUS AC68U is an affordable, durable choice. I’ve been using mine for 5 years with no issues. Speeds max out around 45 Mbps for 128-bit OpenVPN connections.
2. Configure the VPN Client
You’ll need to manually configure your VPN settings using configuration files provided by your VPN service. Any VPN with OpenVPN servers will work (basically all of them).
Setup guides by VPN service
- Cyberghost: DD-WRT | Tomato | ASUS
- ExpressVPN: DD-WRT | Tomato | ASUS
- IPVanish: DD-WRT | Tomato | ASUS
- NordVPN: DD-WRT | Tomato | ASUS
- Private Internet Access: DD-WRT | Tomato | ASUS
Tip: Make sure you add your VPN’s DNS servers in your router admin panel, to make sure you can take advantage of any built-in SmartDNS capability.
3. Consider a dual-router setup
If you already have a router from your internet provider (or a spare router laying around) you can connect the VPN router behind the other router, allowing you to have one network for VPN connections and one for your normal ISP connection (your wife will thank you).
Learn how: Setup a dual-router network for VPN
4. Connect your TV or Streaming stick
Connect your streaming device (wherever your apps live) to the VPN wifi network. It will automatically use the VPN connection.
#4 – Share your PC’s VPN via Wifi
It used to be really hard to share a wifi connection from your computer to other devices. Now, thanks to better OS’s (Windows 10) and multi-band network cards, it’s really easy to do.
Windows 10 VPN connection sharing
- Right-click on the wifi icon in the bottom-right corner of your screen (system tray)
- Select Open Network & Internet settings

- Choose Mobile Hotspot from the left site menu and turn the hotspot ‘ON’
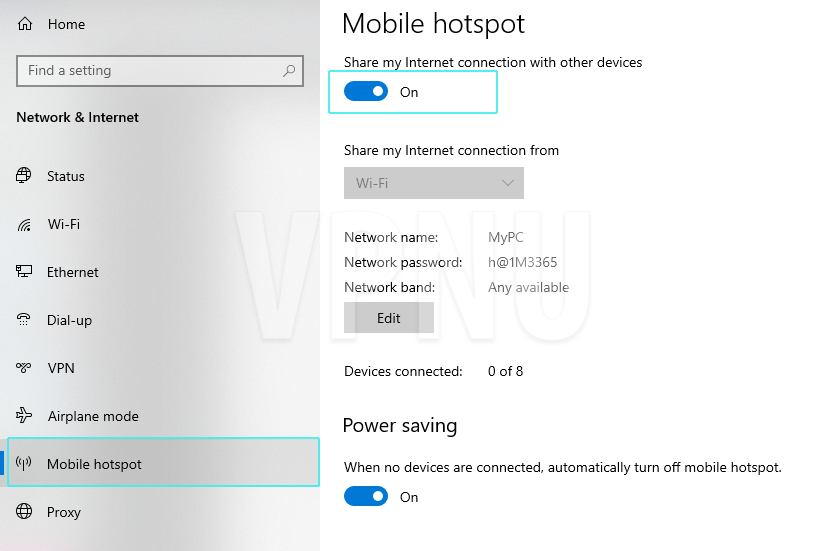
- You can click ‘Edit’ to change Network name or Password
- Start a VPN connection on your device (don’t skip this step!)
- Choose Status from the left-hand menu, then select Change Adapter Options
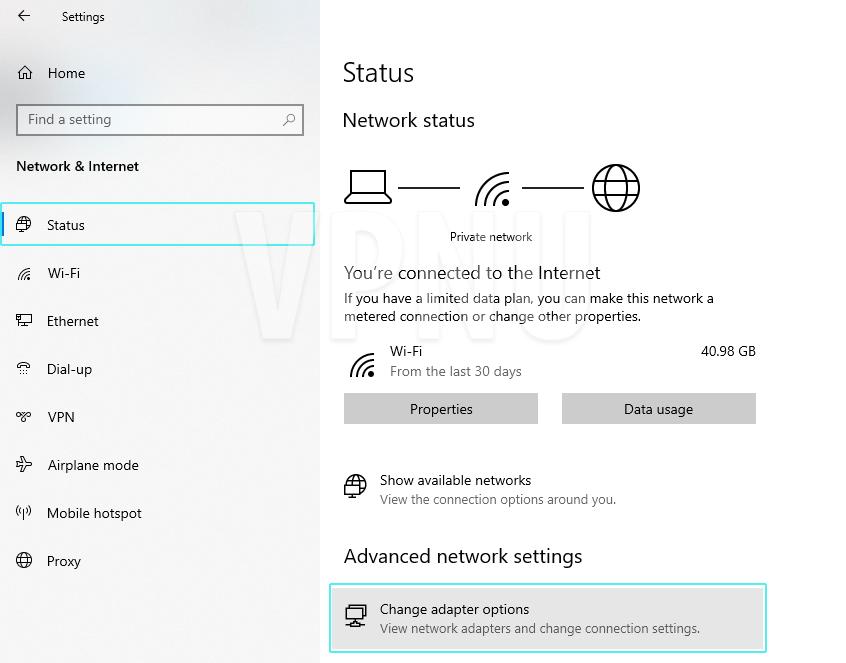
- Find the Network Adapter created by your VPN. If using the VPN software/app it may be something like TAP Adapter.
- Right-click the adapter and select Properties from the context menu
- Go to the Sharing tab
- Select Allow other users to connect through this computer’s internet connection
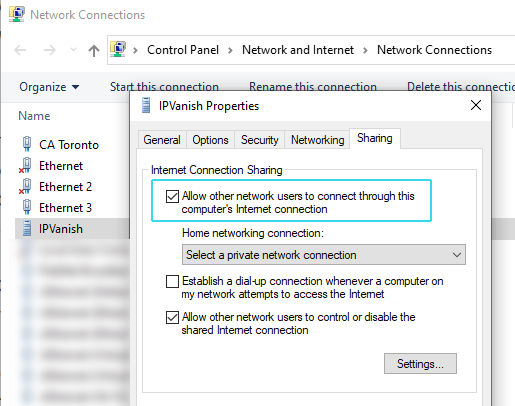
- Click OK to apply changes
- Connect your SmartTV (or streaming box) to your computer’s shared Wifi Network
- Your done! Go watch something!
#5 – Use SmartDNS
VPNs are great privacy tools, but they’re also overkill for general streaming. If you’re using mainstream apps like Netflix, Hulu, iPlayer, Hotstar, or Disney+ there’s no need to encrypt your traffic. All you need is to unlock the service from your location.
And that’s exactly what SmartDNS does.
And there’s no software to install, no special routers to buy, and it’s basically a one-time setup.
You can even configure SmartDNS directly on many popular SmartTV brands, including: Samsung, LG, and Sony. But you may be better off adding the DNS servers to your router instead, especially if you want to use it for multiple devices.
VPNs that include SmartDNS:
Standalone SmartDNS services:
How to set it up
First, you’ll need to log into your SmartDNS service’s control panel and tell them your IP address (it’s how they prevent anyone from using the DNS servers).
Then go to the network settings of your SmartTV and add the DNS servers there. Or you can do the same thing on your router admin panel.
Here’s a demo from ExpressVPN (Samsung TV)
Pros & Cons of SmartDNS
The biggest advantages of SmartDNS over VPN are:
- Less likely to be blocked in the future
- Works on devices that aren’t VPN-capable (SmartTV)
- Faster speeds = higher resolution (and less buffering)
- One-time setup
Disadvantages:
- You usually only can access one content library per service. This really only matters for Netflix though.
Summary & FAQ
There are multiple ways to route your SmartTV (or streaming device) through a VPN tunnel. The easiest is to install a VPN app directly on your AndroidOS smartTV. But manufacturs like Samsung don’t have this option. Instead, you can share your VPN via wifi.
And if all else fails, consider SmartDNS. You only have to set it up once, and you can unlock geo-restricted streaming apps from almost anywhere. Just don’t try to use it for things like streaming via Kodi Addons, as a SmartDNS provides no privacy or encryption.